Wacked steering column

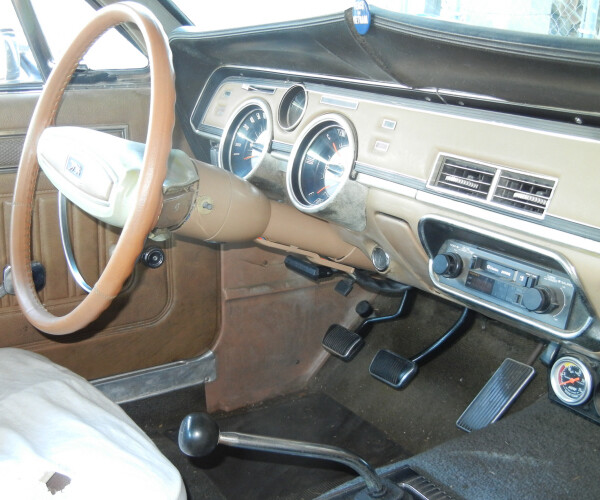
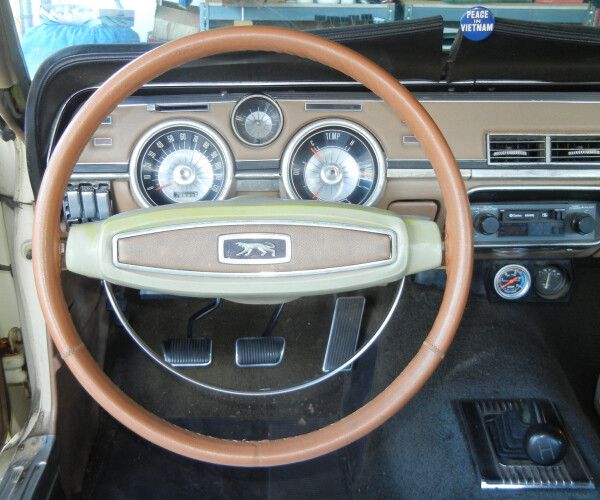
Now that I can drive my 68 again, I note that the steering wheel/column has an odd bit of play: it sags at the under-dash mounting bracket. But the wheel can be lifted up, and the column tube pivots up/down roughly at the point of the mounting bracket. And this car doesn’t have a tilt-away wheel.

I’ve made a 7-second video from the passenger side for anyone who’s interested. You can see the column from the wheel nearly down to the firewall. The vid can be downloaded here [1.66MB]:

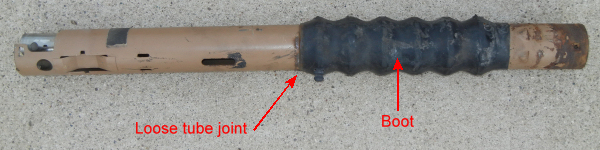
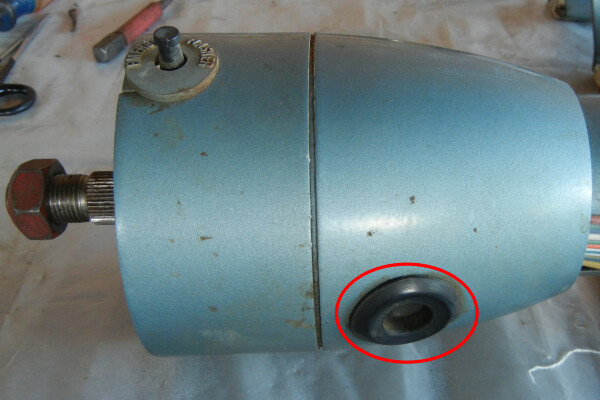
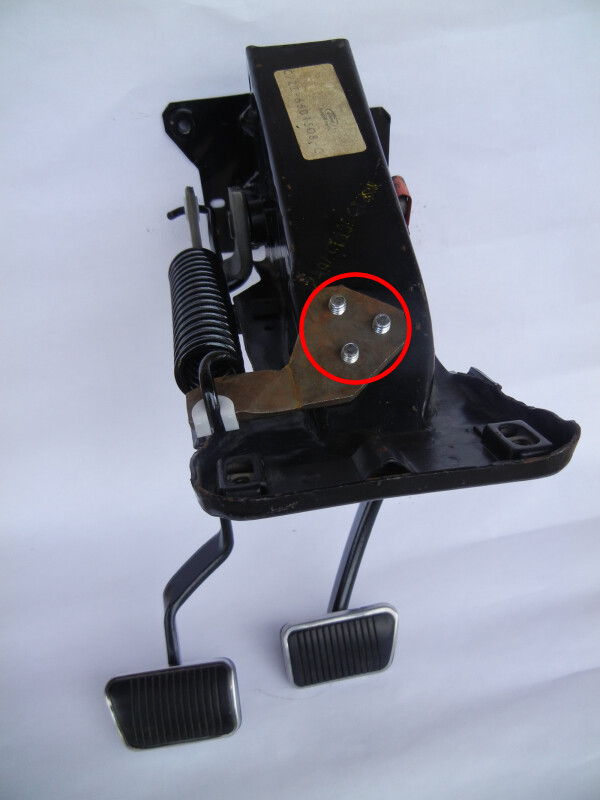
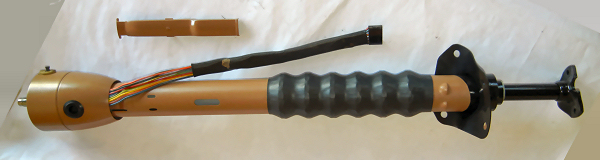
The under-dash bracket, upper clamp, lower clamp, and cover are all tight, probably like the day it was new. That said, I see now that the lower clamp (at least) may be shifted forward about an inch, as evidenced in the photo below:


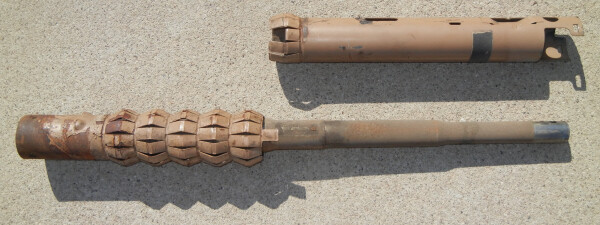
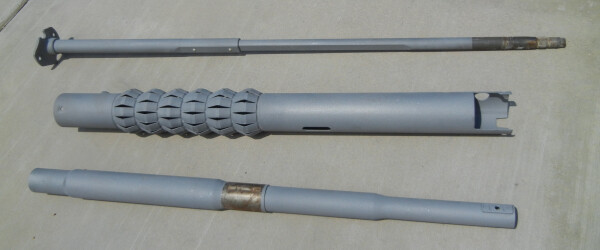
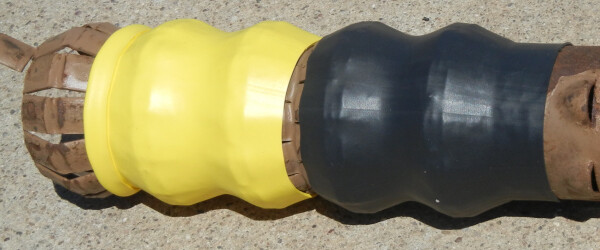
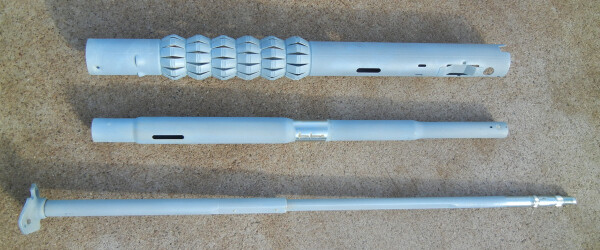
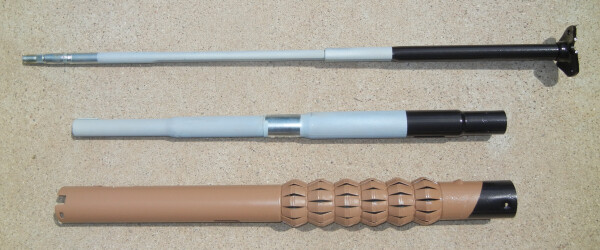
A bit of history: This vehicle suffered a fender bender in 1988, which resulted in replacing the front right fender. I spilled a drink but don’t recall hitting the steering wheel. It doesn’t appear to me that the collapsible section of the column tube is collapsed at all. Still, page 3-24 of the 68 Shop Manual states:

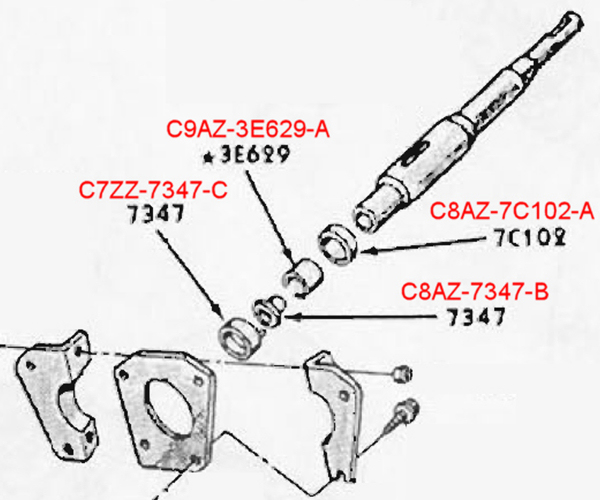
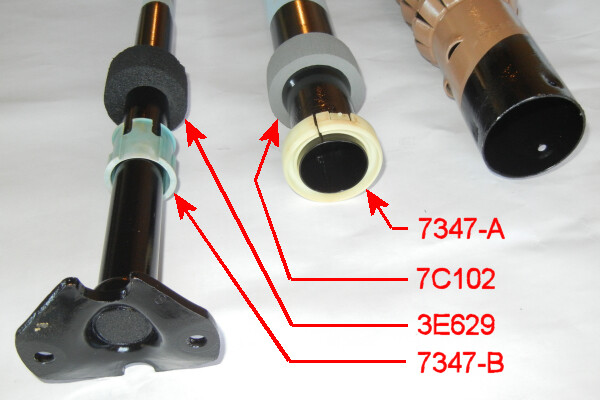
The shift tube > [N/A this vehicle] > and the steering shaft are provided with nylon dowels and will shear and allow them to collapse in proportion to the [column] tube upon impact.
Once the steering column has been collapsed, a complete new column must be installed with new brackets which will also shear away during impact.

I supposed it’s possible that the steering shaft collapsed a bit and I never noticed it before. If that’s all it is, do you think I could just loosen up the mounting assembly bolts, shift the assembly back toward the steering wheel, and re-tighten to fix it?

Another possibility, I suppose, is that some of the internal nylon dowels have sheared simply due to age. Has anyone experienced this before? Even though Ford/Mercury says replace the whole kit & kaboodle, are the dowels replaceable?

If not one of these options, what do you think the problem may be? Any and all ideas welcome.

I can see that you have a problem, just from your picture above.

Those aluminum spacers (where the top nuts are) should be seated lower than shown. The whole column is too low in the brackets. Likely the tiny shear pins in your two piece steering column shaft have broken (very common).

If your steering column has ever been removed, someone very likely set it down on the rag joint too hard and those pins broke and the shaft has slipped, and the over all length is shorter.

You can probably fix it without removal.
Loosen you upper column bolts.
Remove both the lower clamp and one of the bolts from the rag joint so that you can pull the column up, allowing those aluminum spacers to seat themselves completely in the bracket. Once the upper hardware is snug, you should be able to pull the inner shaft down to engage the steering box again.

Hope this makes sense.

Scott, it all made sense and you sent me on the right track. However, I found a slight variation of your diagnosis: the support bracket wasn’t secured to the pedal hanger, so it and the two column clamps had slid down the steering column tube. What a surprise!

Instead of the three bolts that should secure the bracket to the hanger, there are only two, installed above the bracket. I couldn’t get to them with the steering column in place, so I pulled it completely out. (It doesn’t appear to be collapsed at all. What is the proper length, just to verify?) Unfortunately, now that I can get to those bolts, they won’t come out. I can turn 'em just fine, but they’re just spinning in place (as near as I can tell).

The rag joint is in bad shape, too, so time to replace it. And since everything else is already out, I might as well give the steering gear a good inspection. I was planning on doing that anyhow, a little bit later.

Some of you may remember my earlier post about finding a badly worn 69 upper clutch rod in my 68 coupe. Well, I replaced it with a 68 rod, which went in but didn’t exactly have great clearance through the firewall.

Well, as part of my steering column spelunking --and in order to extract the two bolts that should’ve been holding the steering column bracket to the dash-- I finally had to pull out the clutch and brake pedals and pedal support. Turns out the bolts and the clutch assist spring bracket were all stripped; redundancy appears to have been the only thing holding my clutch and brake pedals up for years and years! :open_mouth:

As I got to looking at things more closely, it appears that I have a 67/68 pedal support bracket (C7ZZ-6501508-C label), a 68 brake pedal, and a 69 clutch pedal. Here’s a photo of the two pedals. Can anyone confirm my pedal identifications?


If I’m right on the 69 clutch pedal, I think I’ll replace it with a 68, if available. That should also clear up the rod clearance issues.

Also, is the (bent) bracket at the top of the brake pedal intended to have a bumper on it? If so, can anyone point me in the right direction to buy one? Or even share a part number; I don’t see it in the 65-72 MPC.

I can’t imagine why anyone would’ve switched out clutch pedals and rods but I can’t believe it was a late-in-the-model year factory substitution, what with the completely botched installation of the steering column support brackets.

Thanks for the help,

I’ve been researching 68 fixed columns for several days now, pouring over the 65-72 Mercury MPC, several online forums – including Mustangs, various parts vendors, eBay, etc. And, I’ve torn down my column to its basic components, most of which are in remarkably good shape but in need of a good cleaning.

Now I’m a bit puzzled by the lower column end, especially the various bushings and insulators. Here’s an edited diagram from the MPC. I’ve added the FoMoCo part numbers (from the MPC) in red. Some of these are surely different from the 68 MPC, but I don’t have that available to me:
68 Steering column_fixed_bottom diagram.jpg
My inner and outer column tubes are still connected together at the bottom by what I assume is C7ZZ-7347-C. It has three tabs attaching it to the outer tube, one of which is visible in this photo:


None of the other three parts were present when I tore things down. Ever wary, I’m not prepared to disassemble it any further until I know I can get replacement parts. Here’s what I’ve found thus far:

  • C7ZZ-7347-C - Bearing - Upper (I’d call it Outer Bushing) > NOTHING
    C8AZ-7347-B - Bearing - Lower (I’d say Inner Bushing) > Muscle Car Research 7347-2
    C9AZ-3E629-A - Insulator (Steering Column Shaft) > MCR 3E629-1; NPD has similar
    C8AZ-7C102-A - Seal (Transmission Control Selector Tube) > MCR 7C102-1; Ditto NPD

I’m wondering if these three parts are correct? Has anyone used them before? Any tips?

Does anyone know options for the 7347-C bushing? I’d be OK leaving it as is, but then I probably won’t be able to install 3E629-A either.

Beyond that, there’s a fair amount of slop at the joint between the top half and the collapsible (accordion) portion of the outer tube, which still has the black boot on it. It easily offsets 1/2-3/4" at the top end, probably further if the inner tube wasn’t there to stop it.
68 Steering column_fixed_outer tube.JPG
How much slop should be expected? Is it possible to tighten this up a bit if I remove the plastic boot? Or is it “not broke, so don’t fix it”?

Then, I’d need to replace the boot. There was an NOS boot on eBay earlier this week; I didn’t buy it. However, it seems to me that some large-diameter shrink wrap tubing would work nicely as a alternative. I’ve done a little research and found several options, though none are as thin as what I’m measuring here – just 0.03" thick. I’m a little concerned that a much thicker shrink wrap might hamper the function of the collapsible section of the outer tube. Have others encountered / solved this?

Again, thanks for any input or suggestions you may have.

Nate,

Your column tube is broken. Right where the solid piece meets the collapsible part… It is probably under the giant piece of black heat shrink tubing.

You could try welding it…or simply get another outer tube. You can buy new sections of heat shrink…

Other bits…
Your 67 pedal hanger is fine. Same part used for 67 and 68. There should be a rubber bumper on it for the clutch pedal extension to hit against.
I think your clutch pedal is fine. It is a 68. 69 has different over center spring, and square pedal pad. There may be a date stamped into the pedal pad, underneath the rubber pedal pad.

You have plenty of clearance on either side of the collapsible section of the column, for both pedals, so all looks good! A 67 brake pedal will almost rub the column!

Hope this helps!
Steve

Thanks, Steve. I cut off the boot and found this:
Busted 68 column tube.JPG
AACK! That opens a whole new bucket of worms. To repair or replace, that is the question. I’ll ponder… :think:

FWIW, any tips on where to get appropriate heat shrink? If not, I’ll continue researching and post my solution when I get there.

Also checked under the pedal pad for a date stamp. No love there. I’m still puzzled on this because I thought both 67 and 68 clutch pedals were configured like this at top:

[Thanks to WCCC]

At least, that’s how the 68 Shop Manual and 65-72 MPC illustrate it.

Thanks to desertdave55 :beerchug: for setting me up with a replacement column to mine for parts! It’s from a Mustang and, aside from color, is identical. One difference I’ve noted, though, is that the column extension has a plug (377977-S) in the attachment screw access hole:
ColumnExtensionPlug.JPG
My original column extension did not have a plug here and a plug isn’t shown on various Ford parts diagrams. What’s the norm with Cougars … plug or no plug?

I think I’m about ready to put everything back in the car but have a couple of fastener questions. I’m hoping group wisdom can help. For reference, my car has a fixed column and 3-speed manual.

When I disassembled things to diagnose the steering column problem, I found that the steering column-to-pedal hanger bracket had been installed wrong: there were only two bolts, they were only through the pedal hanger to the clutch assist spring bracket – the steering column bracket was unsupported, and they were stripped. I’ve refurbed all of those items and have three new bolts, which now properly hold the steering column bracket to the pedal hanger and are torqued securely into the clutch assist spring bracket on top of the pedal hanger. It’s all rock solid:


What I’m not sure about is if there should be nuts on these bolts. I found none when I took mine apart, but we already know it wasn’t installed correctly. The 68 Shop Manual shows variations:

Part 2-2, Fig 25 - Dual Brake Master Cylinder Installation - Mustang & Cougar without Power Brakes (pg 2-27) does not illustrate that part of the hanger;
Part 3-3, Fig 10 - Steering Column Installation (pg 3-31) shows a nut - “Brake Support 379930-S7, 3 Req’d, 12-16 Lb. Ft., Auto. Trans. Only;”
Part 3-3, Fig 11 - Tilt Wheel Steering Column & Related Parts - Disassembled (pg 3-32) shows a nut;
Part 5-3, Fig 3 - Mustang & Cougar Clutch Linkage Disassembled (pg 5-12, detail at top right) does not show a nut.

What’s correct: Leave it as it is right now or add nuts? If nuts are added, what type?

My other question is about the nuts securing the steering column bottom clamp to the upper clamp, bracket, and pedal hanger / instrument panel. Here’s what came off the car – two zinc-plated all metal smooth-flanged locknuts, two (rusty) hex nuts with integral star washer, and two zinc-plated hex nuts (different thicknesses!) with stainless split-ring lock washers:
Lower column clamp fasteners.JPG
Again, given the prior install errors and the diversity of the existing nuts, I’m wondering what are the correct fasteners for these six bolts?

Looking forward to your input,

Hey Nate,
The blue column you have is from 8R01C140649, which was a low-optioned 3-speed manual, manual steering, manual drum brakes car. I just looked at another 68 column I have from 8R93F523231, which was auto C4, PS, PDB and it also has the same plug.I don’t think the VINs and options really matter, but just throwing it out there just in case.

I can’t believe how long it took fix this – 6 weeks plus. Here’s how it all played out. Since I was working on steering, I also decided to rebuild the steering gear and replace my tie rod end dust boots.

I fully disassembled the column I received from Dave. It was in great shape, except that the two nylon dowels in the steering shaft may have sheared – it’s about 1/2" shorter than the steering shaft in my column. Two parts were salvaged from the replacement: the outer tube and the C8AZ-7437-B plastic bushing (between the steering shaft and inner tube). The column boot was in great shape so I hated to cut it off, but it had to be done. The replacement outer tube was solid, with a bit of rust on the lower end that extended into the collapsible “accordion” section.
Salvaged outer tube.JPG
My original coupler (rag) joint disc was shot so I took it apart and bought a Dorman rebuild kit.

I had the following pieces sandblasted:

  • The original steering shaft and inner tube;
  • the replacement steering shaft, inner tube, and outer tube;
  • the original column-to-pedal hanger bracket, upper column clamp, and lower column clamp;
  • both original and replacement column-to-firewall retaining brackets;
  • the original coupler joint main body and (4) retaining clips;
  • the original Pitman arm and center link; and
  • the original brake and clutch pedals.

Prior to blasting, I taped all machined surfaces, the column shaft and inner tubes around the nylon dowels, and the original painted date stamp on the inner surface of my lower column clamp.
Lower clamp date stamp.JPG
Sandlblasted column components.JPG

While parts were out for blasting, I disassembled, cleaned, and reassembled my steering wheel. I documented that process and may post a “How To” on it, just for kicks. Suffice to say here, though, that I’m pleased with the results.

After sandblasting, I had all of the steering column tubes and shafts and all coupler joint pieces (plus the two coupler-to-steering shaft screws & one original nut) zinc electroplated. This may be a bit overkill but I figure the extra protection will extend their life, especially the parts exposed to weather and heat in the engine compartment.

While all of that was out getting done, I focused on disassembling, cleaning, and rebuilding the steering gear and linkage. All of the gear internals are in great shape (for a 47yo!), so only had to replace the thrust bearings & races, the needle bearings, and the two seals. Got it back together and adjusted to spec without any problems. I put an (iron) phosphate & oil finish on the Pitman arm and centerlink. The tie rods were in good shape, but rusty, so I wire-brushed the ends clean and applied phosphate & oil to them, too. Lubed the ball joints and then pressed on original-style dust boots.

I also requested and received samples of 3M FP-301 Flexible Polyolefin Heat Shrink Tubing, in 4" and 3" diameters (yellow and black, respectively, in image below):
Heatshrink test.JPG
After testing both on my broken outer tube, I decided the 3" was a better choice because its recovered thickness was virtually identical to the original boot. (The end of the 4" test rolled back because it didn’t extend all the way up & over the incline plane of the collapsible section. It didn’t impact my decision.)

In retrospect, I would not have the steering shaft and inner tube sandblasted; the pickling step of the plating process was sufficient to remove the light surface rust and they would’ve come back with a consistent shiny surface, as seen one the taped surfaces:
Zincplate column components.JPG
Anywhoo… once I got the parts back from electroplate I set about refinishing everything.

Because my current goal is preservation and not concours restoration, I just used basic Rustoleum primer and gloss black paint for the column bracket and upper clamp, all four column-to-firewall retaining brackets, the coupler main body and retaining clips, and the brake and clutch pedals. Like the steering linkage, the unpainted portions at the top of the clutch pedal received phosphate & oil.

My biggest challenge was the interior paint because I only needed a little bit. Local paint shops I contacted quoted ~$300 to paint the outer tube, lower clamp, and wiring harness cover (I hand-stripped the outer surface only, as the original paint was crazed.) In the end, I found a local auto paint supply shop that was able to make a custom color-matched rattle can. I used a filling primer and hand sanding to hide the minor pitting from the blasting.

I primed and painted the outer tube, lower clamp, and wiring harness cover with the interior color. I also primed & painted the lower end of the outer tube, inner tube, and steering shaft with the gloss black for another layer of protection.
Painted column components.JPG

The heatshrink was next. I estimated that each collapsible ring was ~1", plus another 1/2" at the bottom, plus a bit to accommodate potential longitudinal change (which 3M says it ±5%), plus a bit more for good measure. In the end, I cut a piece 13-5/8" long, aligned it to start ~1/4" before the topmost collapsible joint, and began shrinking at that same end, working my way slowing down and around the tube to keep everything relatively even. It didn’t shrink tightly into the valleys, nor did it change much longitudinally, so I ended up with about 2-3/4" excess at the bottom, most of which I didn’t even shrink. I trimmed the top end tight to the first joint and the bottom to 1/2" beyond the last joint.
Heatshrink applied.JPG
Once that was done, it was just a matter of reassembling everything and installing it in the car.

The bottom of the column assembly has seals and bushings.
Lower steering components.JPG
I bought the two seals from Muscle Car Research. Bushing 7347-A is from my original column and -B is salvaged from the donor column. 7C102 was a perfect fit between the inner and outer tubes. Unfortunately, the OD of 3E629 was too large to fit between the shaft and the inner tube: the overall thickness was 3/8" and it tore up while I was trying to install it. Instead, I cut a piece of 1/4" x 1" foam weatherstripping with adhesive backing and stuck it to the inside of the inner tube. I used the “hole” from 3E629 to plug the center of the steering shaft (at the coupler flange). Here it is all put together, including the firewall seal:

I was on a roll while re-assembling the top of the column and didn’t stop to take photos. :frowning: (I do have dis-assembly photos, though, so if anyone’s interested, let me know and I’ll share them, too.)

It all came together nicely, though, ready to install into the vehicle:
Re-assembled column.JPG
Re-installed 1.JPG
I didn’t repaint the column extension or flange, so there’s a light scratch visible. I’m happy with the color match, though.

I also didn’t have any 3/32" sheet rubber on hand to place between the column and the upper and lower column clamps. I have some small pieces of the left over heatshrink tubing in there right now and will replace when the sheet rubber arrives next week.

Here it is from the driver’s viewpoint:
Reinstalled 2.JPG
All in all, I’m happy with the results. The column is rock solid now, and I think it’ll last another 50 years … or until I’m ready to do a full-on restoration!

Fantastic write up! This is a great service to the community. Thanks for doing such a super job!

Ditto!

Excellent thread - I have my steering column out and disassembled at the moment so looking to do something similar for my 67 with fixed column.

Replacing the upper bearing :
https://www.npdlink.com/product/bearing-assy-steering-column-original-1-316-inch/148808

I cant find what goes at the engine end of the column. There were traces of some foam which looked like what the shop manual calls “insulator 3C577”. Wasnt able to find anything similar. I found some “seals” - what are these ?
https://www.npdlink.com/product/seal-steering-column-tube-to-steering-box/148853?backurl=search%2Fproducts%3Fsearch_terms%3Dsteering%252Bseal%26top_parent%3D210001%26year%3D

Is it worth replacing the rag joint ?
https://www.npdlink.com/product/insulator-steering-joint-coupler-polyurethane-aka-rag-joint/148817

Turn signal switch is broken and i already have the part from WCCC.

Anything else i should be looking to replace ?

The pedal / steering column brackets originally were bare metal. Yours is painted black, and it has a service parts decal on it, which means it has been replaced at some point, probably due to an accident.