Did i see an injection carb on top,?
How do you like it, is it a significant improvement over carb ? Does it run smoother and more economical etc etc
Yep Holley Sniper. I’ve had it on the car over a year now, absolutely love it. A bit more economical, starts reliably every time. Biggest difference I noticed is drivability, much more smooth and responsive. None of the part throttle hesitation you might get with a carb. The other nice thing about it, I’ve got it wired to control electric fans, and to shut off the A/C compressor at full throttle.
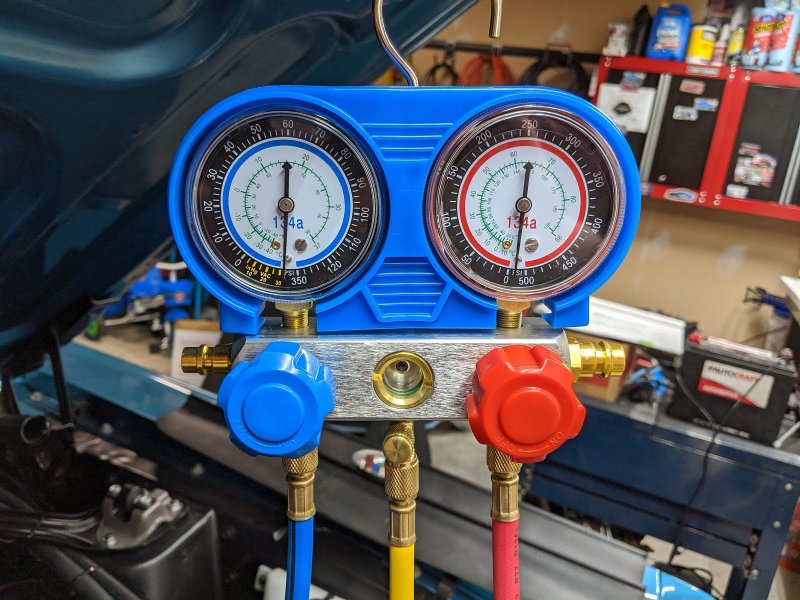
I decided to try doing the A/C charge myself. I got a vacuum pump and set of manifold gauges. Unfortunately I found that all the R-134a can taps use ACME thread, while the gauges use flare fittings… ![]() After I waited for this adapter to come in the mail I was able to pull a vacuum down and charge the system. According to the Vintage Air instructions it takes 1lb 12oz of refrigerant. So I used 2 full cans and then measured off 4oz from the 3rd can with a small kitchen scale. It all seemed to work OK and I got ice cold air from the vents!
After I waited for this adapter to come in the mail I was able to pull a vacuum down and charge the system. According to the Vintage Air instructions it takes 1lb 12oz of refrigerant. So I used 2 full cans and then measured off 4oz from the 3rd can with a small kitchen scale. It all seemed to work OK and I got ice cold air from the vents!
Also, since I switched from mechanical to electric fans I set the EFI to turn on FAN#1 whenever the A/C clutch is engaged.
Some of those gauge kits dont come with the correct adapter for those taps. My mastercool set actually came with a tap with correct fittings to hook to my gauges. I used to manually charge stuff all the time with a pump, scale and 30lb can and in certain ways I prefer it over a machine especially if you have a shop full of guys beating on it. The machine always seems to be screwed up. Now I can control our equipment and repairs as need so stays operational and have not needed to manually charge for quite a while. The other plus to the manual way is you can dial in your refrigerant charge based on pressure rather then a general spec. This helps to dial it in for your application and climate.
You got cans with just straight R134 correct? Non of that anti leak/stop leak additive? That stop leak stuff is hell on AC components
how involved is it to get the a/c input and fan outputs to the EFI controller?
Good work, really diggin how your car is coming out. Seriously all this stuff has been in my head to get done once I get done with my first phase.
Thanks! Yeah I think we have similar taste in how we want our cars to turn out. Hopefully some of this will help you out when you get to it on your car.
I got straight R134a, no stop-leak or added oil. It just bugs me that if you try to buy everything local to do this job from auto parts stores/HF you’re out of luck. They have the manifold gauges sitting right next to the R134 cans on the shelf, but there is nothing in the store that actually allows you to connect them together.
It’s not too bad getting the inputs/outputs to the EFI, if you can wire up a relay you’re good. They’re ground-trigger, so for the fans you hook the output to the coil ground of your fan relay (terminal #86 most likely). The A/C signal and shutdown were a little trickier as they’re also both ground-triggered. The A/C signal required an extra relay as you need to send a ground signal to the EFI when the compressor kicks on. The A/C shutdown is a ground-trigger from the EFI when throttle is above 80% or so. For this I ran the A/C compressor clutch through a relay that had a normally closed terminal (#87a). So when the EFI triggers it, the 87a terminal opens and power to the A/C clutch is cut.
That’s why I got that extra relay/fuse box, with all these additional relays I figured that would be much neater than a bunch of single relays mounted all over the place.
When I replaced the leaf springs, I ordered them with a 1" lift. I was afraid the car might end up with the reverse rake look if I ordered them at stock height. Unfortunately, I overshot and the rear of the car ended up being about 1" too high for my liking. Because of the rubber isolators and pinion wedge Mustang lowering blocks won’t fit a Cougar, and there’s nothing in the aftermarket currently . I was inspired by DieselD’s homemade lowering blocks. I don’t have the welding skills for that, but I do have access to a 3D printer. So I took some measurements, mocked up a model in SketchUp and made a test print. The cylinder on the top needed to be a bit wider but otherwise the fit was dead on:


I decided to make the block slightly less than 1" thick (I think I settled on 7/8") just to build some very slight forward rake in. After confirming fitment using the 3D print, I used an online machine shop (3dhubs.com in this case) to CNC the shape out of aluminum. I tried a few different machine shops and they were by far the most reasonably priced (I even had them powder-coated since it was only a small extra charge). They took a few weeks to complete and ship, but they fit really well:


The blocks fit perfectly on the axle and don’t move around at all. I did need longer U-bolts, Dorman part#35605 was the perfect size:


Damn, you took my cobbled together block to another level! Nice work! Im surprised no one is making blocks for cougars yet.
Im still not happy with how mine is sitting in the rear. I need to lower another inch at least. Might try a 2" block before spending money on springs to see if it gets me where I want to be or not. Im hoping having the interior back in the car will lower some but not thinking its going to make too much of a difference. Im shooting for a level ride height from front to back or at least the appearance as such.
Thanks, hope you don’t me stealing your idea! I was also surprised no one is making blocks for Cougars, but I guess they usually have the opposite problem where the rear is sitting too low. A batch could be made fairly affordably if a bunch of people wanted to do a “group buy” sort of thing. Most of the manufacturing cost for these from 3D Hubs is the initial setup, adding more units doesn’t actually increase the price that much. But I’m not sure how much of a need there is out there.
I attached the 3D files in both STEP and STL formats in case it would help anyone else down the road.
LoweringBlock_Cougar_20mm.zip (352 KB)
And for the icing on the cake, I finally ditched the wheels that came with the car. I picked up a set of the blemish styled steels that Don was selling a while back. Was too good a deal to pass up, and honestly the blemish in the paint kinda just looks like part of the character of the wheel anyway. I went with a staggered setup, 15x7 with 225/60/15 on the front and 15x8 with 245/60/15 on the rear. I love the stance, and there’s no rubbing since these wheels have the correct backspacing. The black Mercury man center caps seem to be on intergalactic backorder, so I went with the blue instead. Seems to work OK with the paint color.


Well it’s getting close to winter so back at it again…
The manual drum brakes were starting to get a bit sketchy, probably in need of a new master cylinder so I decided this would be a good time to rip out the old stuff in the system and put in a new power front disc setup. To make this easier from the start I pulled the export brace, driver’s seat and steering column out of the car.
Once I had the old MC, pedal box, dist. block, lines out of the car I modified the openings in the firewall to work with the power brake booster. The interior side of the firewall has knockouts you can follow as a template. I used a die grinder with carbide burrs, made quick work of it and was able to cut pretty clean.


I fogged over the firewall with some black chassis paint as best I could.

Now since I’ve had a T5 swap on the wishlist for a while, I thought it would be crazy not to install a clutch pedal and linkage while all this stuff is apart. I decided to go with the Modern Driveline hydraulic setup, so I also modified the firewall to accommodate the clutch master cylinder. The MDL bracket just barely clears the parking brake assembly, but it interferes with the hole for the speedo cable. I’d like to keep the grommet so I slightly trimmed the bracket to make room. Again the die grinder made short work of this.


Here’s the new pedal box completely assembled. I went with the Modern Driveline bolt-in clutch pedal (which I had to trim slightly to clear the top edge of the pedal box). This might be overkill but I also put the roller bearings in for the clutch pedal.

Working upside down under the dash isn’t fun, but got pedal box in the car.

Looks like nice work!
Very nice work!
I don’t think roller bearings on the clutch pedal are overkill at all. If you have undertaken the Herculean task of getting that pedal bracket out of the car, you don’t ever want to be up in there again. Those old style bushings eventually wear out.
One of the few regrets I made on my car. Had mine back together before I knew about roller bearings.
Looks good, good thinking to get the clutch work done now before having to get back in there later.
Made some more progress on the brakes, clutch and suspension. I had a suspension clunk that just wouldn’t go away on the passenger side front, which I eventually tracked down to the upper control arm. Apparently this is a known problem with OEM-style UCAs (it’s the reason blueprinted UCAs like these are sold). Nothing annoys me more than having to redo work I’ve already done because of junk parts, so I decided to switch to aftermarket arms with roller bearings. I was looking at Global West and TCP but then I found these SPC arms. They have modern roller bearings, the cross-shaft has the Shelby drop geometry built-in with no need to re-drill shock towers. They also have +2 degrees caster designed into them and depending on which holes you install the ball-joint into you can dial in negative camber. The only downside to these arms is they come with cheapo non-greaseable ball-joints. I opted to install a set of Moogs instead. While I had all the suspension out I decided to get the reinforcement plates welded in and hit the whole area with some undercoating spray to clean it up.


I got the brake booster, master cylinder, distribution block and all new lines installed. This would definitely have been easier with no engine/transmission in the car, that corner space gets awfully tight. I also put in the new metal vacuum line for the power brakes and vacuum tree. PSA: All the vacuum caps on the tree were cracked and probably causing vacuum leaks. I’ll be using better heat resistant caps from now on.


After much struggle I also got the Modern Driveline clutch master cylinder installed and hooked up. The lack of space to work around the booster made this extremely tough. I probably should have installed this before the brake components, but my thinking was I didn’t want anything interfering with the install of the booster or brake lines if there were clearance issues. This part is ideally installed when the engine bay and interior are stripped bare. Once it’s in it’s totally inaccessible, so I had to pre-install the clutch and reservoir hoses ahead of time (fingers crossed they don’t leak). Thankfully I still had the steering column out so that helped.


There is definitely a lack of room in that corner, having the z bar in there is even more fun. I had a hell of a time mounting my proportional valve there and bending up lines to fit.
Where is the bleeder screw on that clutch master? Somewhat accessible?
You will like how it drives on the Shelby drop and caster settings. I suggest doing your own alignment to dial it in. It’s pretty easy with one of these
http://www.longacreracing.com/products.aspx?itemid=2446&prodid=7252&pagetitle=Digital-C%2fC-Gauge-w-AccuLevel™-and-Quick-Set™-Adapter
Yeah I was thinking of getting one of those DIY alignment tools. It would end up paying for itself after a couple trips to the alignment shop.
Thankfully the slave cylinder I’ll be running has the bleeder screw and mounts to the side of the bellhousing, so should be easily accessible from under the car. Fingers crossed I won’t have to touch that clutch MC again now that it’s in the car.
Got a bit held up from the holidays and home renovation stuff but I finally got to finish up the brakes.
I ended up going with the Wilwood Dynalite front brake kit (mostly for the price).

The install was pretty straightforward, with a few caveats:
- The 140-13476 kit comes with a hose kit that only works with drum brake or 67-earlier disc style metal brake lines. I put in brake lines that are meant for the 68-up floating caliper style disc brakes so I had to use their 220-9195 hose kit they have listed for 70-up Mustangs (see pics).
- The brake hose fitting on the back of the caliper is actually pipe thread, and they don’t really give you good guidance in the instructions as far as which sealant to use. The consensus seems to be Teflon tape, but I was concerned about a piece coming loose and floating around in the brake system. I ended up using Permatex #54540 hydraulic sealant (see pics) which worked perfectly.
- This kit requires you to use shims (.035" thick washers) to get the caliper perfectly centered over the rotor. I ended up having to use 3 on the driver side and 2 on passenger side to get it dead on.


My hand was about to fall off trying to bleed a completely empty brake system with a mityvac, so I had the crazy idea of using my HVAC vacuum pump for this. Once I found the right combo of hoses and adapters it made short work of it.

Once the car was all buttoned up the brakes felt really good on the road with great stopping power. Unfortunately the brake balance isn’t where it needs to be. Panic stop level of brake application will lock the rears first, enough to kick the rear out. I was trying to avoid this, but I may have to install an adjustable proportioning valve. Annoying as I spent way too much on that repro dist block/prop valve hoping it would just work.
Good stuff!
I feel your pain on the MDL clutch cylinder install. That’s a major ordeal and I can’t imagine doing it with the brake booster installed. I love the setup but I wish they’d publish a very precise template for where to drill the firewall for each year Cougar. On my '70 it was pure blind luck.
Ironically again Im in the same book, same chapter different page. ![]()
I had planned to order the 140-13477 kit but held off with the holidays. I really would rather put the brake money towards the EFI kit but I am not to happy with the granada swap that is on my car now. I feel like I have a caliper hanging up and I really do not want to spend money on another junky reman granada caliper. Brakes keep me from driving, a carburetor does not so this will get done first. Since this swap was on the car from the previous owner I do not have the original drum spindles to use the 140-13476 kit like you used. From my research I should be able to use the 140-13477 kit(70-73 mustang) on my granada spindle since the wheel bearings are the same. This should work better then some other kits out there due to how the caliper mounts up on the wilwood kit.
I already have a adjustable prop valve so that would save me some headache.
They actually make air bleeders which awesome but basically the same is what you did. Typically I can let it gravity bleed well enough to get a hand pump on it and finish the job.
Yeah the placement needs to be millimeter perfect to not interfere with the brake booster outside the firewall and the emergency brake and speedo cable on the inside, was definitely a pain. If I had to do it over again I think I’d use a different setup.