I wasn’t happy with the performance of the brakes, so I actually ended up pulling a lot of the components over the last few weeks to re-check everything. The two main problems were the rear brakes locking first and excessive pedal travel.
The problem with the rear brakes locking first ended up being the pressure differential valve in the distribution block not being centered. This also caused the brake warning light to come on. I didn’t realize that when bleeding the brakes you’re actually supposed to use a tool to keep the shuttle valve centered, otherwise the pressure differential you create will push it towards either the front or rear circuit. Once I figured out it had tripped towards the front circuit, I removed a rear brake line from the dist. block and slowly tapped the brake pedal until the brake warning light went out. Afterwards I immediately pulled the switch and installed this tool in it’s place: https://www.npdlink.com/product/tool-brake-pressure-differential-switch/178818. In addition to triggering the brake warning light, if the pressure differential valve moves towards the front brake circuit (detecting a front brake failure) it will cause the rear brake circuit to bypass the proportioning valve. The idea being if you lose your front brakes you want to have maximum brake pressure to the rear circuit. This was the cause of the rear brakes locking first. Once I got the shuttle valve centered and brakes re-bled the fronts would lock up first as expected.
To tackle the excessive pedal travel first thing I looked at was the pushrod depth on the brake booster. Initially I had checked it with a tape measure, but didn’t realize you need much more accuracy than that. I ended up using a brake pushrod depth tool to set the depth. Pulling the master cylinder to do this was a chore. I don’t know if it’s the combination of the Bendix-style booster and MC on a 67-68, but the master cylinder is right up against the shock tower. I tried every which way to remove it, but I didn’t want to mangle the shock tower or MC bore so I ended up loosening the booster to allow the master cylinder to come out. I set the depth to .004" clearance with the tool and a feeler gauge.
I put everything back together and bled the brakes again. I ended up buying speed bleeders this time, they work great and save a ton of time over any other method I’ve used. The pedal was better, but still didn’t have a good feel. I decided to take a look at the rear brakes and found that the drivers side shoes were gone and the wheel cylinder had started leaking.
I ended up just installing new shoes/drums/wheel cylinder/hardware and parking brake cables on the rear. The spring kit I got was not great, had to end up reusing a couple of the original springs but it all went together OK. Once I got the rear shoes adjusted, parking brake cables snug and did the final on-road adjustment using the reversing method the pedal finally got decent feel back in it. In my mind it should feel a smidge firmer, but it’s way better than it was before and feels safe and comfortable to drive now.
One note about the parking brake cables, 68 Mustang and Cougar cables are the same parts. The Cougar uses a longer cable connector than Mustang to account for the longer wheelbase (The Cougar connector is about 2" longer than the Mustang part). The cables I bought (Inline Tube) were manufactured too long, and there was not enough travel on the adjuster to get them snug. I ended up having to use the Mustang-style cable connector to shorten the entire assembly and bring the length of the cables back into the effective range of the cable adjuster. I don’t know if the ACP or Scott Drake cables are any better.
While I was battling with all this, I ended up getting a couple brake pressure gauges so I could see the actual pressures being produced from the front and rear. Once everything was working correctly a panic stop level of pedal application produced 1100psi front/900psi rear with the engine idling. Enough pressure to stop the car adequately, and the proper front/fear balance to prevent rear lock-up. So in the end I spent a lot on brake-specific tools I’ll probably use very rarely if ever, but worth it for me to have the piece of mind that the brake system is setup and working as it should.
Nice work and diagnostics figuring out your issue. Speaking of brake warning light after my install of gauges and reworking wiring I noticed I have that light on as well, I didn’t it have on prior but the bulb must have been burnt out. I was just looking at the getting the centering tool to correct it. This may explain why I feel I have too much front bias but I just haven’t driven it enough to decide.
I like the brake pressure gauges, if nothing else that will help you dial in the bias. I’m a sucker for tools, I’ll buy em just to use once and have just in case. I hate not having what I need to get the job done.
I still wasn’t thrilled with the long pedal travel, so I ended up pulling the master cylinder. Turns out, the Dorman M71248 master cylinder does NOT have a residual pressure valve in the port feeding the rear brake lines as it should. Even though it is advertised as being correct for a power disc/drum car.
NOTE: This is the master cylinder West Coast Classic Cougar sells as their “Economy” offering, I left a review on their site so hopefully WCCC and prospective buyers will be aware going forward.
I ended up swapping in a Raybestos MC36251 master cylinder which DOES have a residual valve installed for the rear brake circuit (you can tell if there’s one installed by sticking a paperclip into the brake port. If you feel a spring pushing back there is a residual valve). It was a PITA, but after getting the new master bench-bled, installed, all 4 corners bled and rear brakes adjusted again for good measure the brakes are working really good now. Pedal travel is right where it should be and feels similar to a modern power disc car.
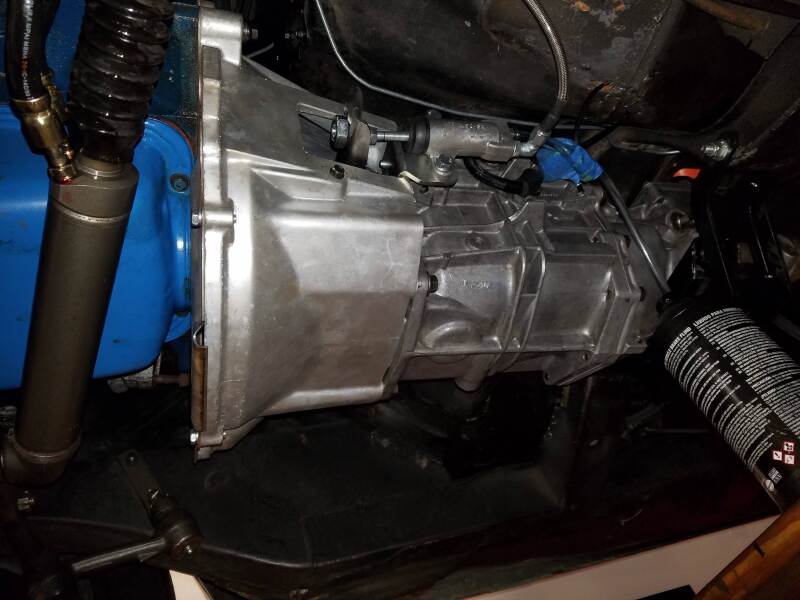
Well, finally had enough of that tired old C4 leaking all over my garage. So out it goes…
In it’s place will be fresh rebuild 3.35 ratio V8-spec WC T5. I also managed to track down one of the older-style Hurst shifter bases. I had one of these in a fox body and I loved the way it shifted. The body of the shifter is also very compact compared to the ones with the big collar around the shift lever, so it may require less trimming of the floor:
I put in a freshly resurfaced 157-tooth 28 in-oz imbalance steel flywheel, Ford roller pilot bearing, McLeod StreetPro clutch kit and a 87-93 style block plate. There seems to be mixed opinions on whether to use thread sealer or loctite on the flywheel bolts. Since the cranks on older Windsor V8s have blind holes for the flywheel, I just used loctite. Even if the crank had thru-holes I’d probably still lean towards using loctite.
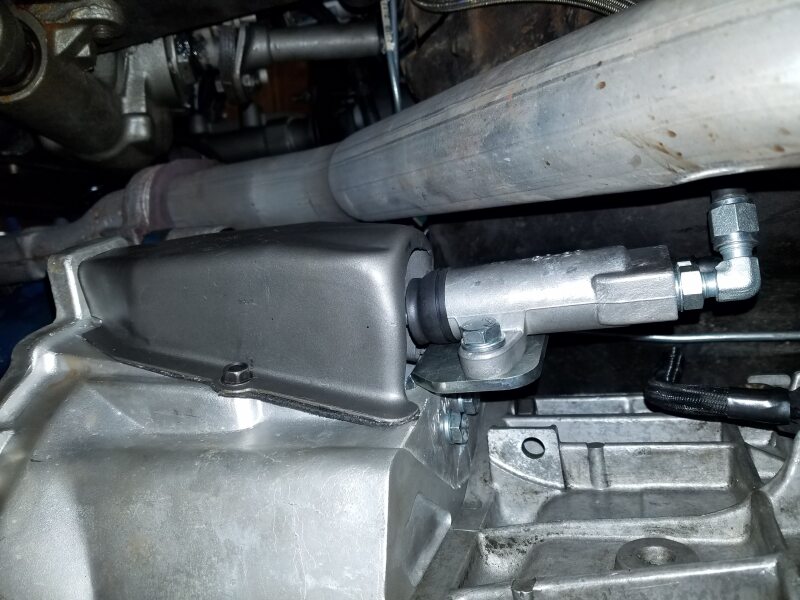
I also got the MDL hydraulic slave cylinder installed and mocked up on the OEM Ford T5 bellhousing I’m using. Just to keep everything fresh I put a new Ford OEM clutch fork and pivot stud in. I was going to use the Ford throwout bearing, but the McLeod one that came with the clutch looked to be a higher quality piece so used that instead. Once I got the bellhousing mounted I checked it for runout with a dial indicator and it was dead on perfect. Less than .001" runout all around, so no need to mess with offset dowel pins or anything thankfully.
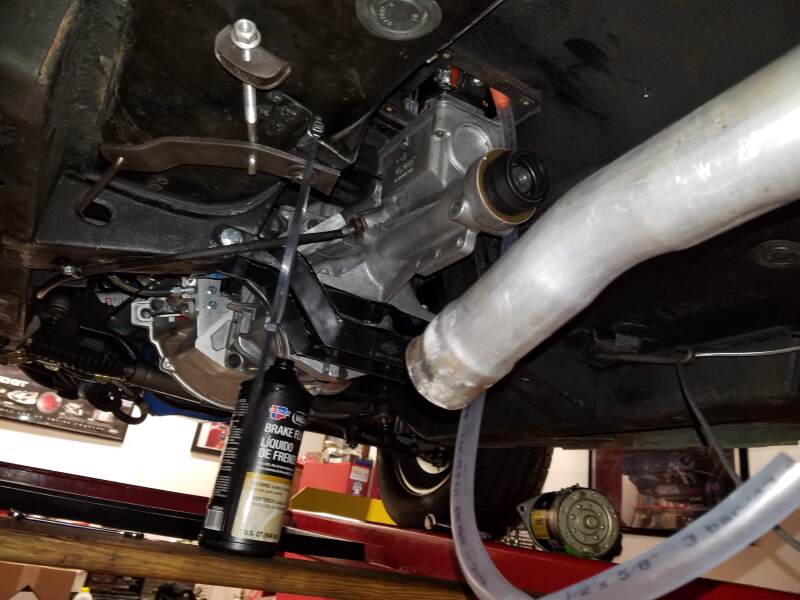
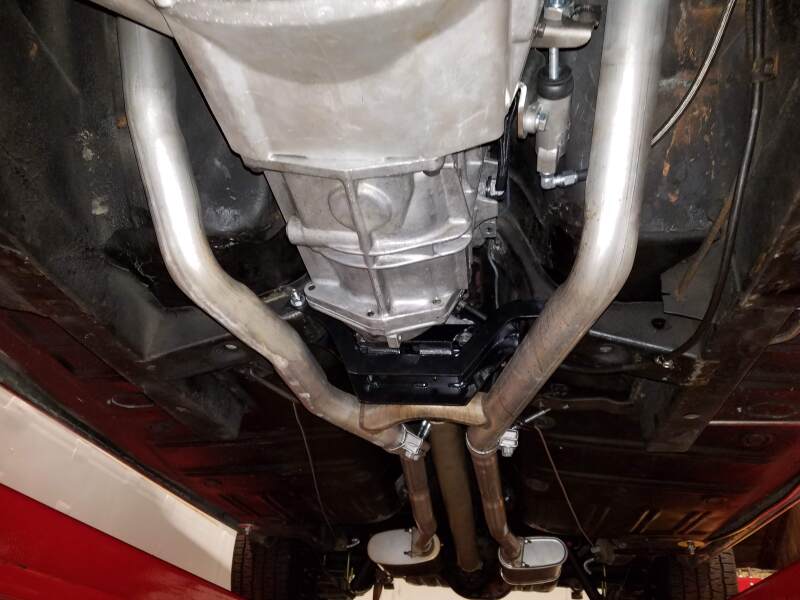
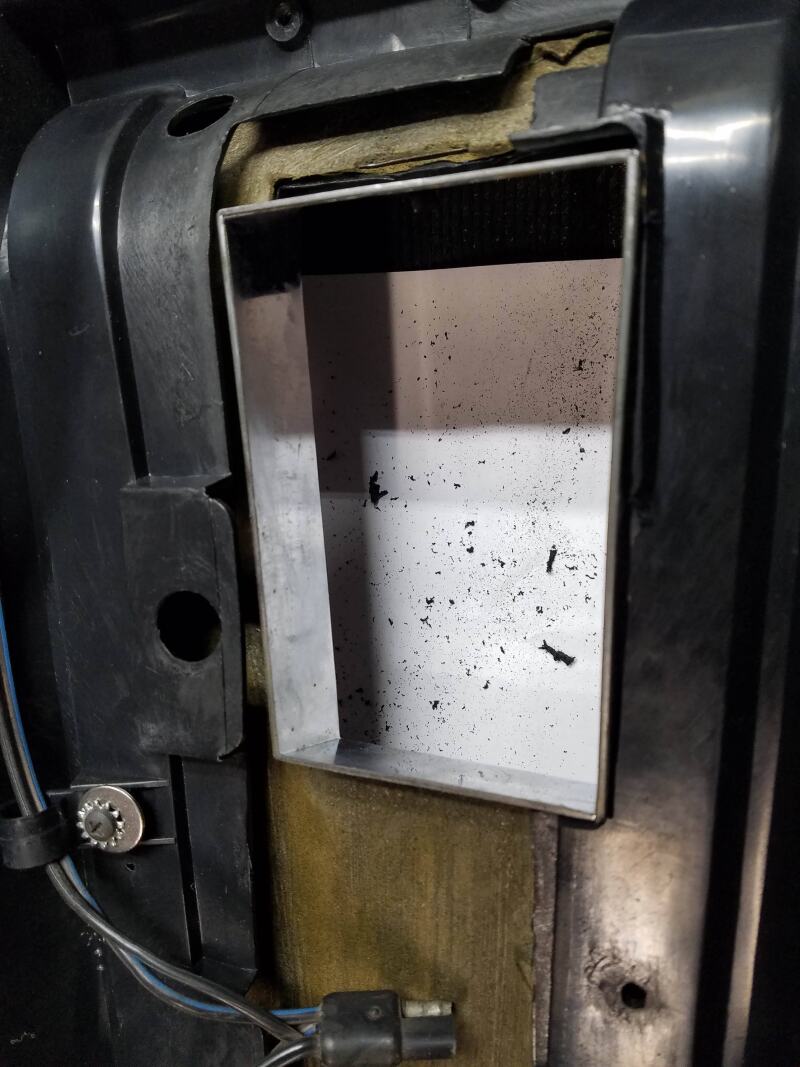
Trans is in, and so far I only had to clearance the tunnel opening a small amount on the passenger side front. I did have to remove the top plate from the shifter plate and reinstall once the trans was in place as it wouldn’t fit through the opening. I used the MDL crossmember and mount, hooked up the hydraulic clutch and bled the system. I used their method for bleeding, had to do it a few times to get all the air out but it did work. The clutch pedal travels to the floor, and the clutch fork sees the necessary 1.2" of travel. It seems to all work OK with the pivot stud at the stock height, hopefully won’t have to pull the trans back out to adjust that. The pedal feel is very light, I think I could have got away with a heavier clutch using this hydraulic linkage but it’s all good. Looks like the shifter sits about an 1nch forward from center in the hole, that may cause me some issues with the OEM console I’m planning to use but I’ll worry about that when I get there.
I read all kinds of conflicting info about driveshaft lengths, but after measuring I can confirm that the T5 requires a driveshaft that is roughly 1 inch shorter than a C4 transmission. I ended up ordering a custom driveshaft from Speedway Motors. Looked pretty well made, came with decent greaseable U-joints and only took about 4 days to arrive. Unfortunately I had an issue where the slip yoke that came on the driveshaft wouldn’t slide into the T5 without extreme force, the new tailshaft bushing in the T5 was too tight. The old slip yoke from the C4 did slide in however, so I just swapped that over onto the new driveshaft. Got the exhaust bolted back up, and put the dust cover over the clutch fork that I modified to clear the slave cylinder. I was also able to reuse the starter motor from the C4 without issue.
Also installed 1/8" NPT plugs into the radiator ports for the old trans cooler lines:
At this point I moved the car forward a bit in each gear just to test the transmission was ok and the clutch linkage was adjusted correctly. So far so good.
very nice, I may eventually go with a T5 down the road. they make for great drivers.
How your electric fans holding up? Ive been researching fans lately. I really want to ditch the stock non clutched fan, also need a 24" radiator as well. Ive seen some Aluminum radiators with electric fans and matching shrouds that seem reasonable however not quote sold on aluminum radiators vs a good copper radiator.
Thanks for posting your updates, I enjoy seeing your build and updates as its right up my alley with making upgrades to the cougar. I enjoy reading all the stock restorations type stuff too but this is what I really enjoy. Seeing what guys do to customize and upgrade rather then rebuild back to original.
Yeah I’m trying to remain as stock appearing as possible but upgrade to modern stuff where I can. I drive this car everywhere and take it on long trips so for me modern conveniences like an overdrive trans, hydraulic clutch, EFI, electric fans, etc are of more value to me than keeping the car 100% original. It’s also not a particularly rare car/option combo, if I owned a Boss 302 Eliminator or something like that I’d probably feel differently.
I’m a big fan of your build as well, how you’ve done some not-OEM but tasteful choices. I love how your interior came out especially.
The fans have been 100% rock solid and keep the motor cool even in stop and go traffic on a 90+ degree day with the A/C running. The dimensions of their shroud also perfectly fit the footprint of the 24" OEM style radiators. I’d highly recommend them. The ACP aluminum radiator I used is a nice piece, but if I had to do it over again I’d probably do a 24" brass/copper radiator.
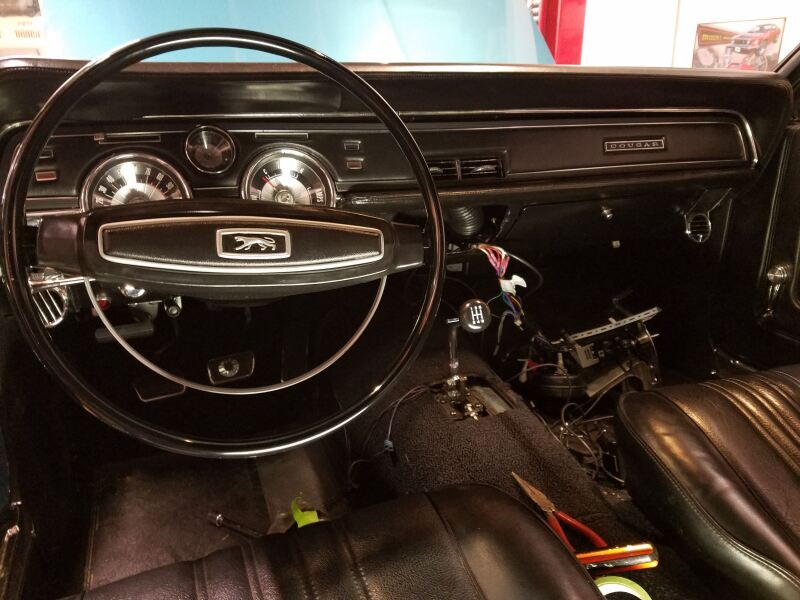
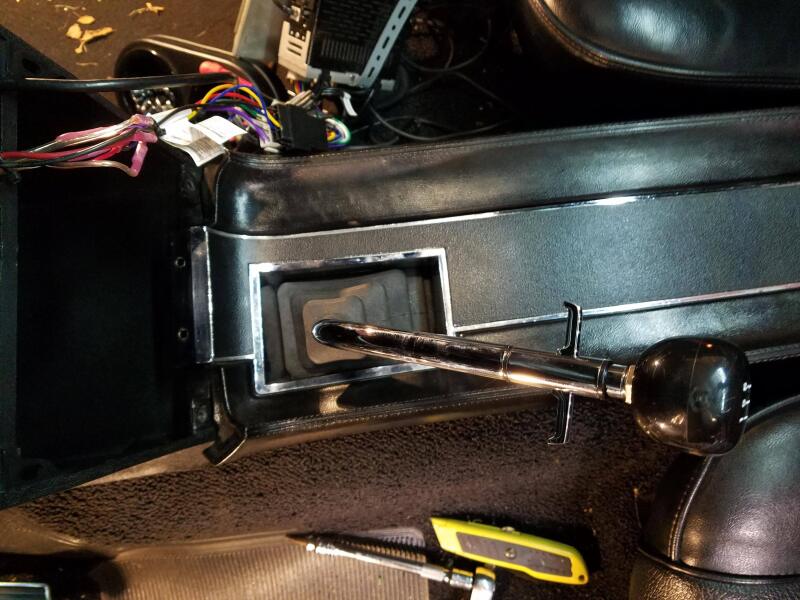
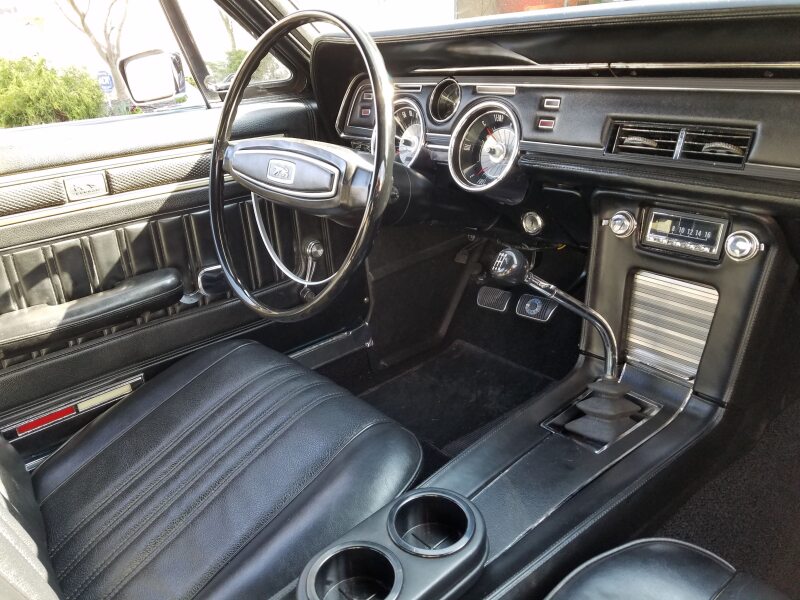
So after going for a short test drive and making sure there were no clearance issues between the shifter and floorpan, it was time to start working on the console. After much searching on ebay, craigslist, FB, etc I eventually tracked down a decent quality 4-speed top piece for a 68 Mustang/Cougar standard console. It wasn’t cheap but I really wanted to stick with the factory console as I love the way it looks. I had to do some minor trimming of the console base to fit the 4-speed top on.
The T5 shifter isn’t perfectly centered in the console opening, but it’s close enough that it should work. I know Modern Driveline and American Powertrain sell shifters with an offset to address this, but for me it was close enough and that saves me having to spend $300 on a new shifter.
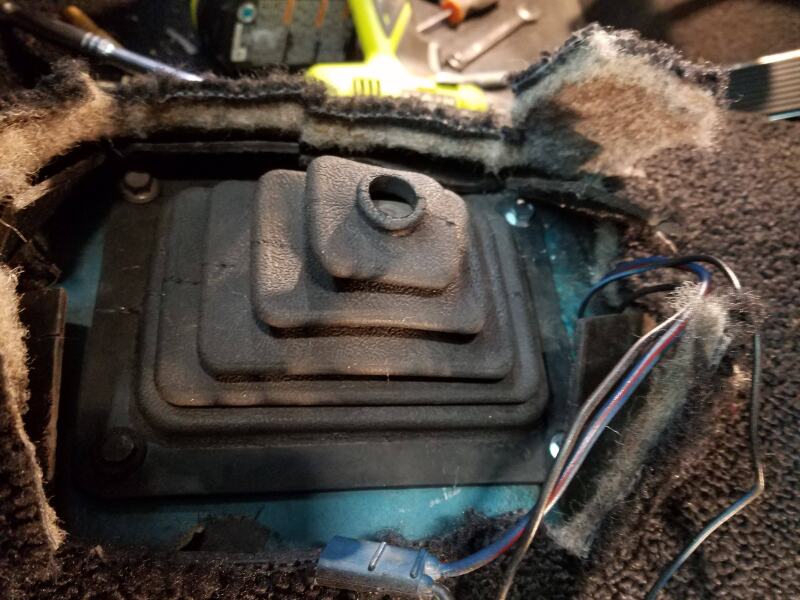
For the shifter boot, the square 67-68 style was way too small to fit over the T5 shfiter, especially one with stops. Again if I bought one of those slimmer, offset shifters it may have worked but I found another solution. I used a 69-70 3-speed (for round shift lever) boot, which is rectangular shaped and just the right size to fit over the shifter. I re-used the two rearward bolt holes in the shifter opening, and drilled two new holes for the two forward mounting points. The result is it fills out the console opening a bit more than a 67-68 boot, but to the untrained eye still looks like it belongs there. Even though the shift lever is not perfectly centered in the console, it still has room enough to shift into every gear without hitting anything. I ended up using the “stock appearance” T5 lever. Yes I know it’s technically the 67 style but I like the looks of it.
Very nice. I really like the factory look. I found the 3.00 gears were to tall for the overdrive to be really usable. I was shifting out of 5th a lot due to lugging the engine. So I re-geared mine with a set of 3.5 gears. More fun around town and easy cruising on the highways.
Yeah I’m noticing exactly that after some driving. New rear gears are definitely on the plan, but I wanted to get the overdrive trans done before steeper gears so I didn’t end up with a car that’s screaming on the highway. Are you happy with the 3.50 gears or would you go up to 3.70 if you could?
I’m fine with the 3.5. I may have been happy with 3.7’s too. I don’t recall my RPM at this time. But will post it tomorrow after a shake down drive with my new carburetor,
The carb swap became a night mare of sorts. I stared at noon my time and it is still not on the engine. Thanks to Holley’s engineering changes. Nothing major, just they moved the PCV port to the rear of the throttle plate rather then to the R/H side. I had to modify the throttle cable bracket to clear the port. It is hanging up with the paint drying now. I’ll start a new thread with the fun and games later.
Man that thing is really nice, wish i could make myself do that kind of quality work, i talk to you on Facebook 67-68 Cougars, i’m putting T5 in mine and was asking you about the Master Cylinder bracket, thanks for the clear pics, they sure help me
Thanks for joining over here from facebook! Take a look around and search the forums. Tons of information here and if you can find something ask and Im sure someone will post a link. What’s nice about the forum format is the ease of finding past information and threads again. I personally like following build threads like this one as they are a great point of reference and ideas.
I wanted to thank you for this, and your review of the master cylinder on the WCCC page. I purchased the same master cylinder from WCCC back in '20 and have been dealing with excessive pedal travel ever since. I literally went through everything in the brake system trying to figure out why, before I stumbled upon your review. I now have the Raybestos MC36251 master cylinder on order. Hopefully that finally fixes it.
Hopefully it helps you out, for me it was the thing that made the difference. Make sure you have the rod set to the right depth in the booster and bench bleed the hell out of the new master cylinder before you install.