Andrew, how does the cooling system work with that longer fan clutch? Does it maintain temp idling/sitting in traffic? I think I have the same issue that I bought the too-short clutch from WCCC.
Thanks Scott! That’s cool to hear. Over the years I’ve heard of a few cases in which people were inspired to save their Cougars because of that roof video, so that feels pretty good! Your son’s Cougar looks great.
It’s been good as far as I can tell! The hardest test was on the road trip when we got stuck in some Bay Area traffic and it was over 100 outside, and of course I had the A/C cranked. The needle on the gauge climbed about to the M or P in TEMP, though I didn’t take a laser reading of what the actual temperature was. Guessing it got over 200 though. Other than that, it’s been totally fine in normal circumstances.
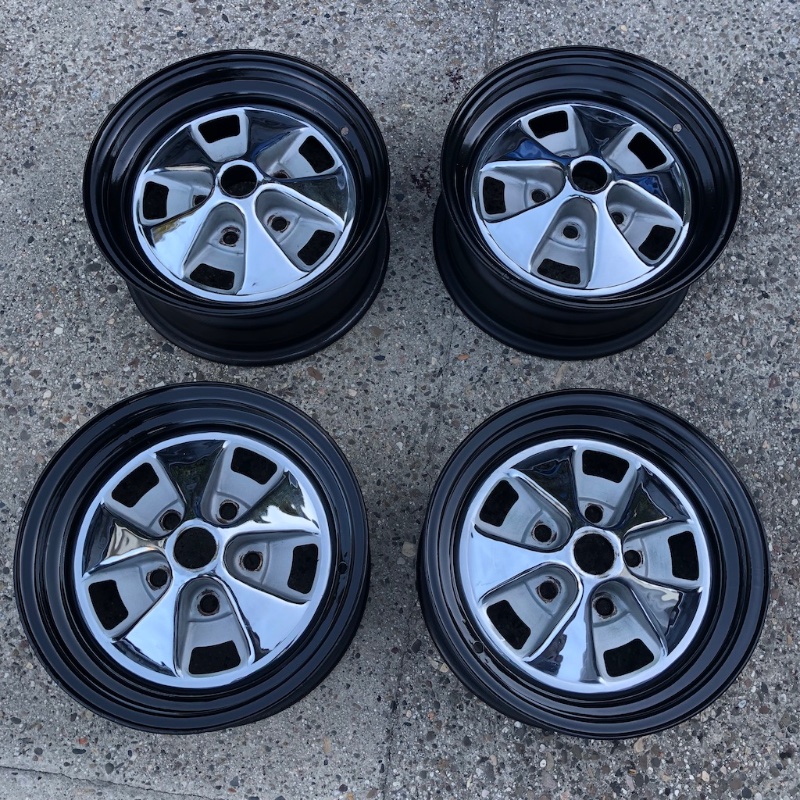
Holy thread revival! There’s finally an update worth talking about. I haven’t been doing much with the car (aside from the odd video) but when Don came across a very nice set of original 1968 styled steel wheels that had been in dry storage for decades, I had to snag them. Thanks Don!
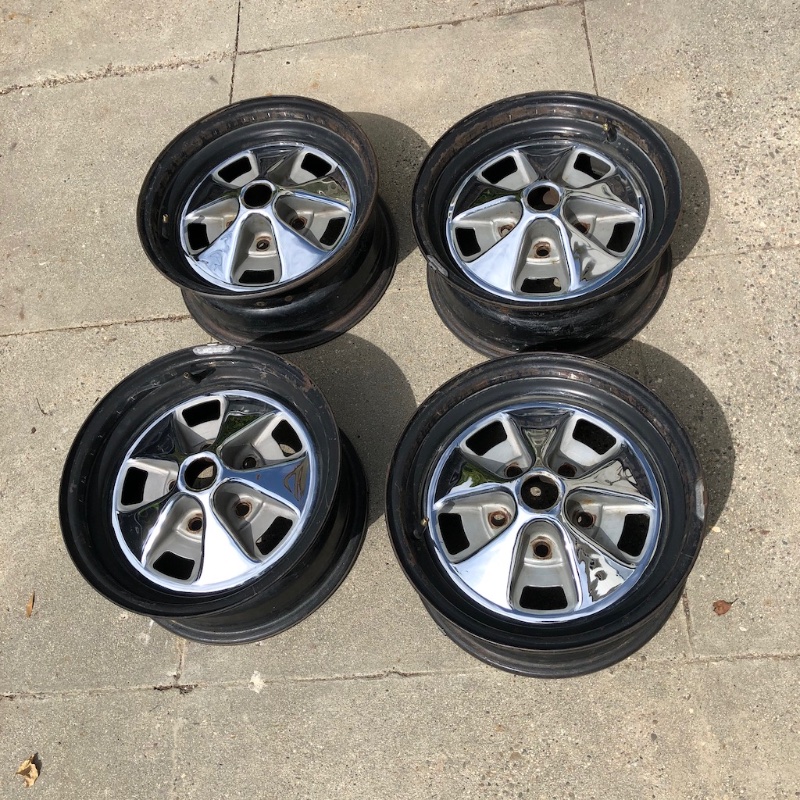
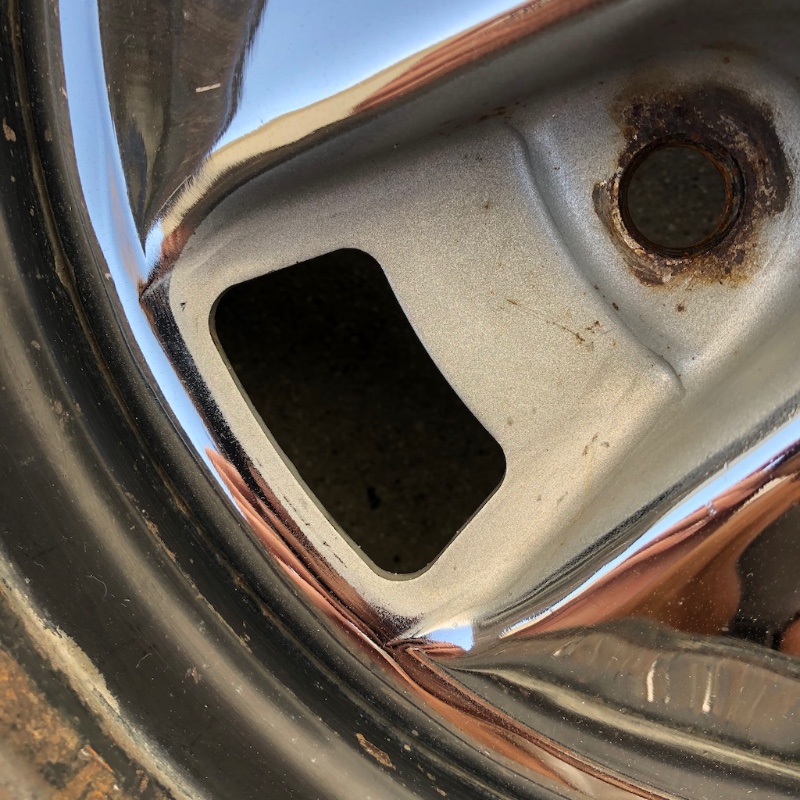
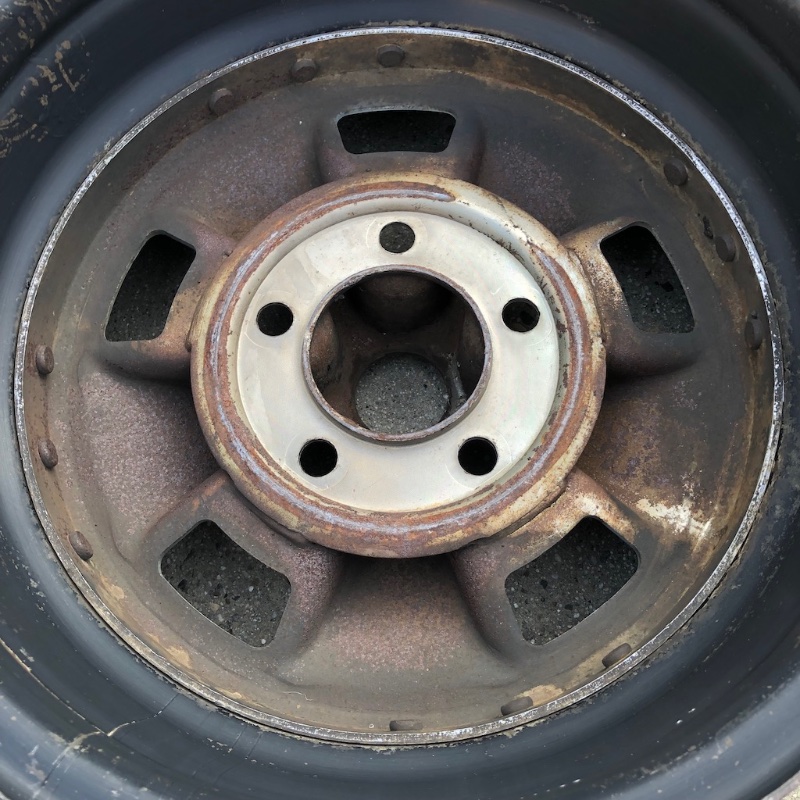
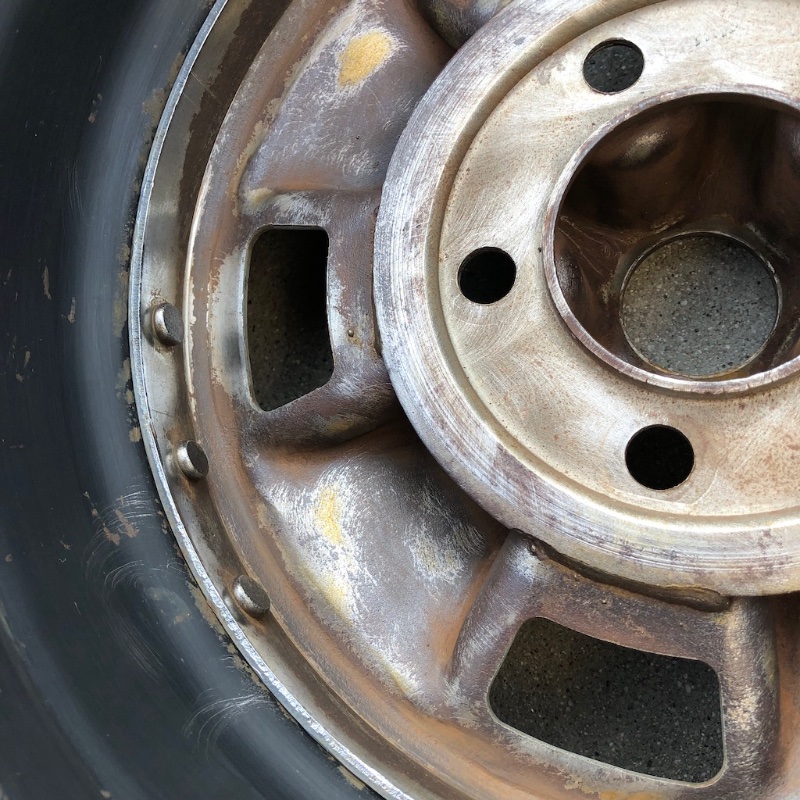
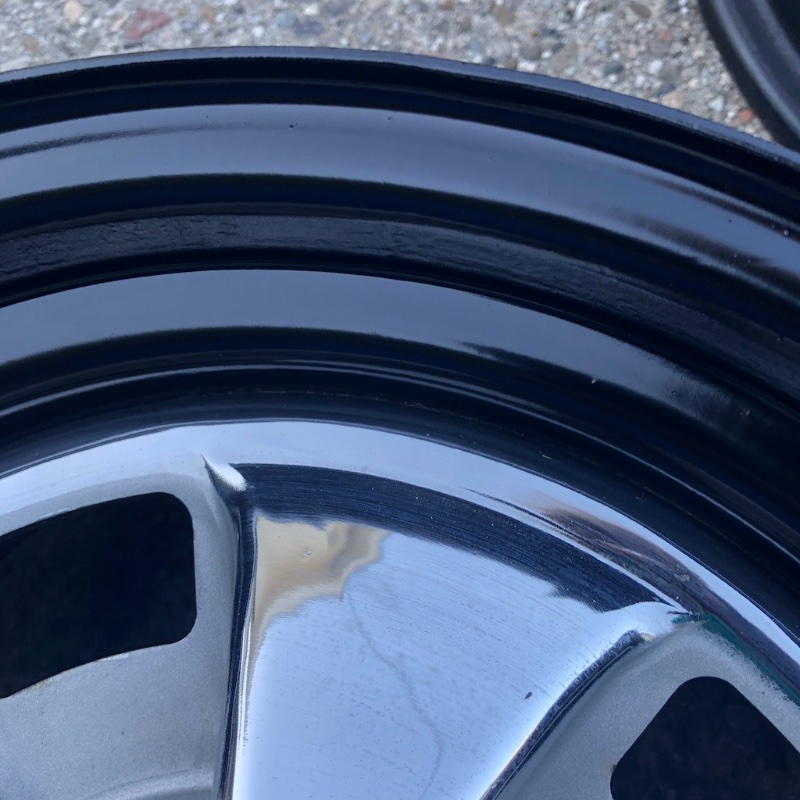
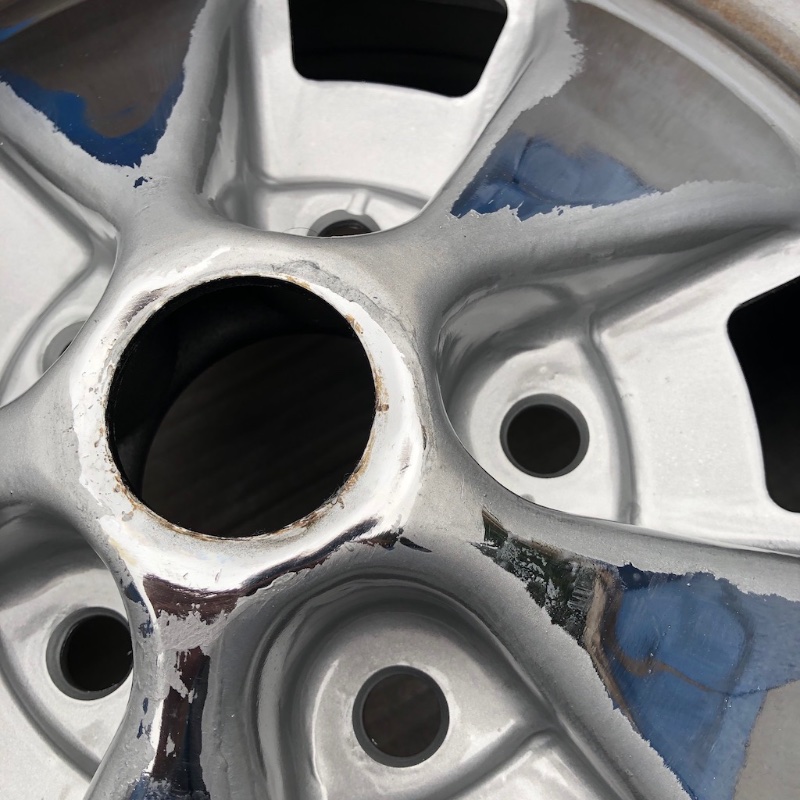
In general they are in excellent shape for their age. There was some general crusty-ness, especially on the back sides, but most importantly, the chrome is in great shape with no pits or major issues. The silver paint is almost completely intact, and I can get a good sense for where the factory masks ended. Just a little crusty around the lug nut holes. I did some general cleanup and removed the valve stems and balancing weights. Here are some pics of condition and silver paint edges.
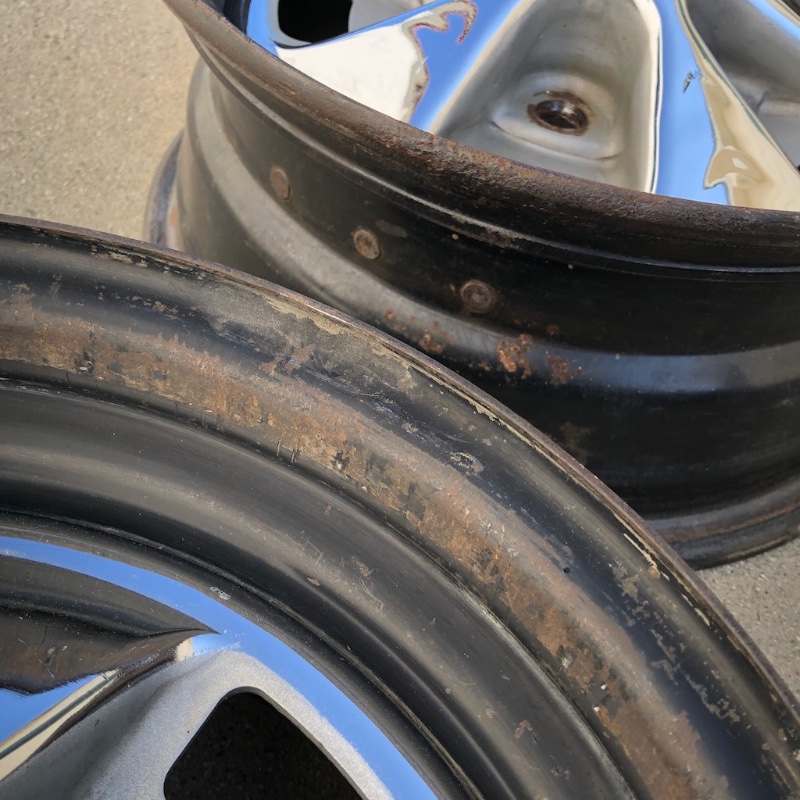

I debated a bit about how to go about cleaning these up, and even whether I should just leave them alone since they’re only original once. But unsurprisingly, I had to try to cosmetically restore them. Can’t be putting rusty wheels on my car. So, I went to town on all the rusty backsides with an array of wire brushes.
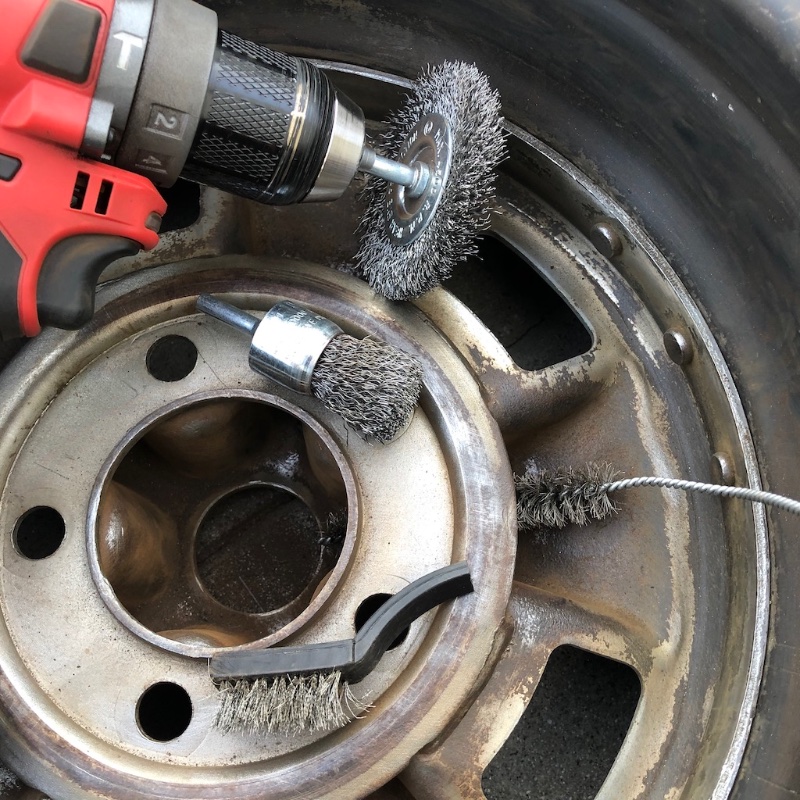
This was a pretty successful operation, at least to remove most of the loose rust on the surface.
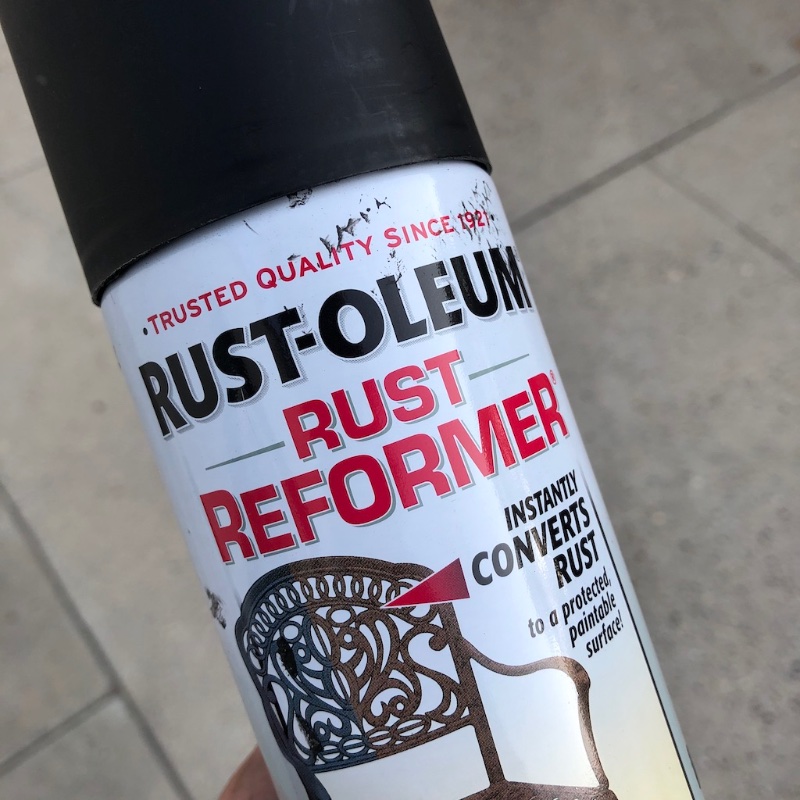
Next I thought I’d try something new. There was no way I could remove all the rust. Even if I had access to a good blast cabinet (which I don’t), I don’t know if I’d risk messing up the chrome anyway. So I grabbed some of this Rustoleum “rust reformer” which supposedly you can paint directly over rust.
So, after giving everything else on the backs and sides a good scuff with scotch brite pads, and trying to make sure I got rid of all the loose rust, I washed away all the debris and let the wheels dry in the hot sun. A few hours later when they were fully dry, I wiped them down with wax & grease remover and went to town.
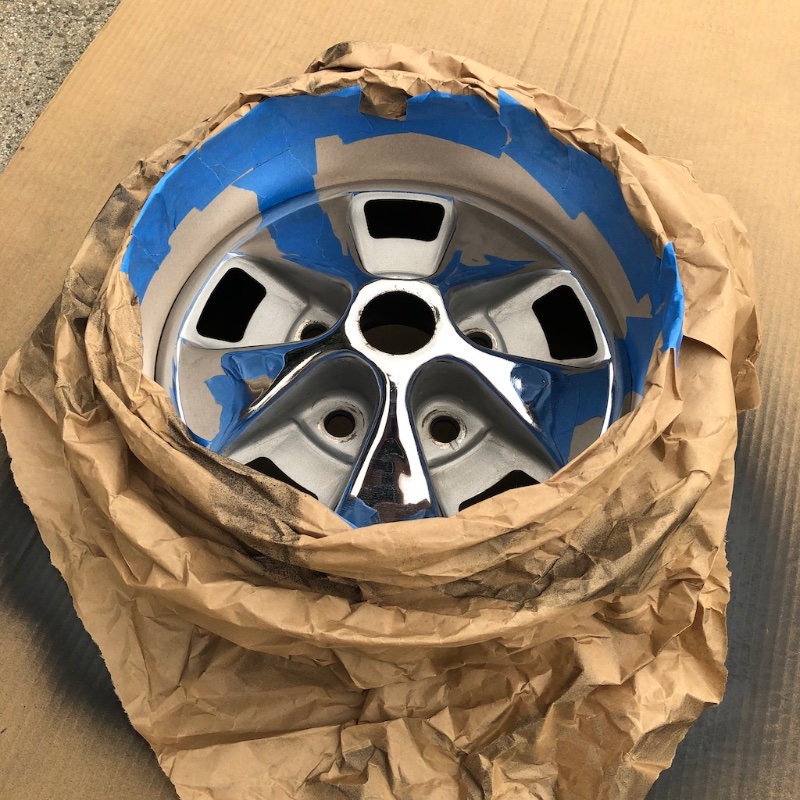
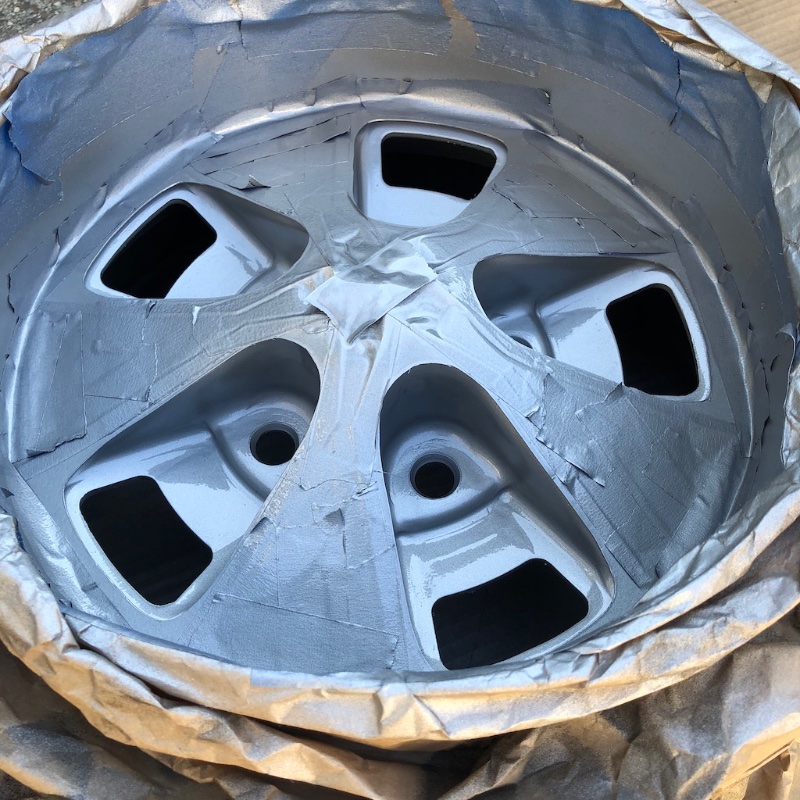
First I had to mask off all the holes, of course.
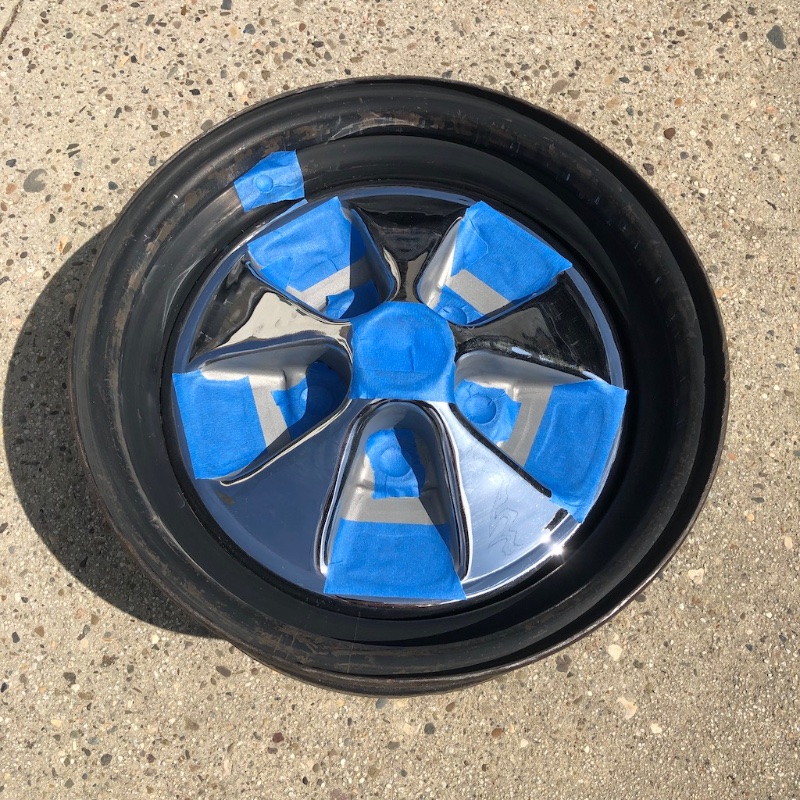
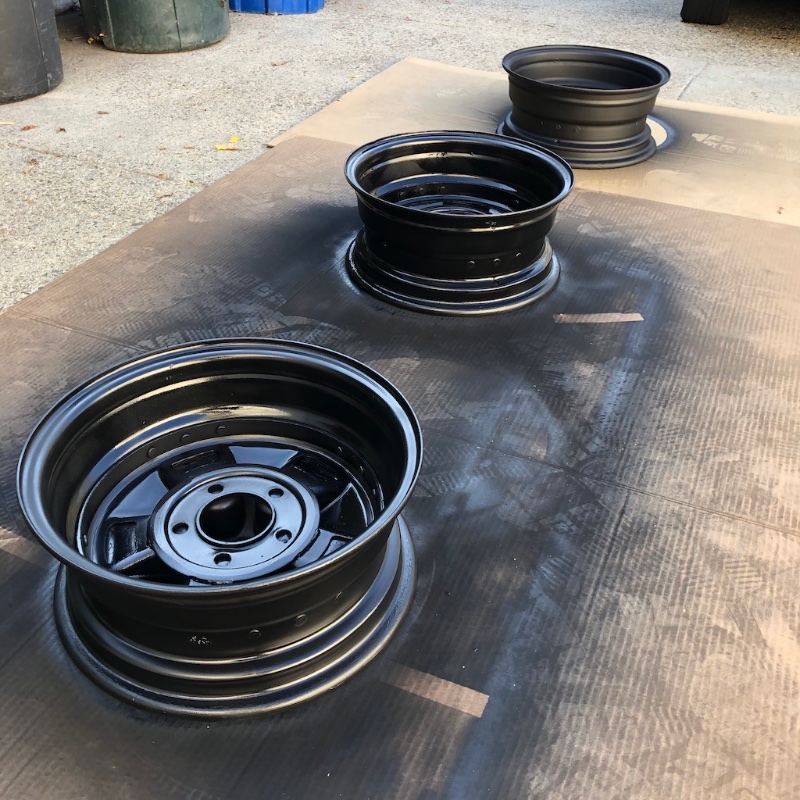
I was pleasantly surprised by how easily this stuff goes on and covers, and you supposedly only need one coat.
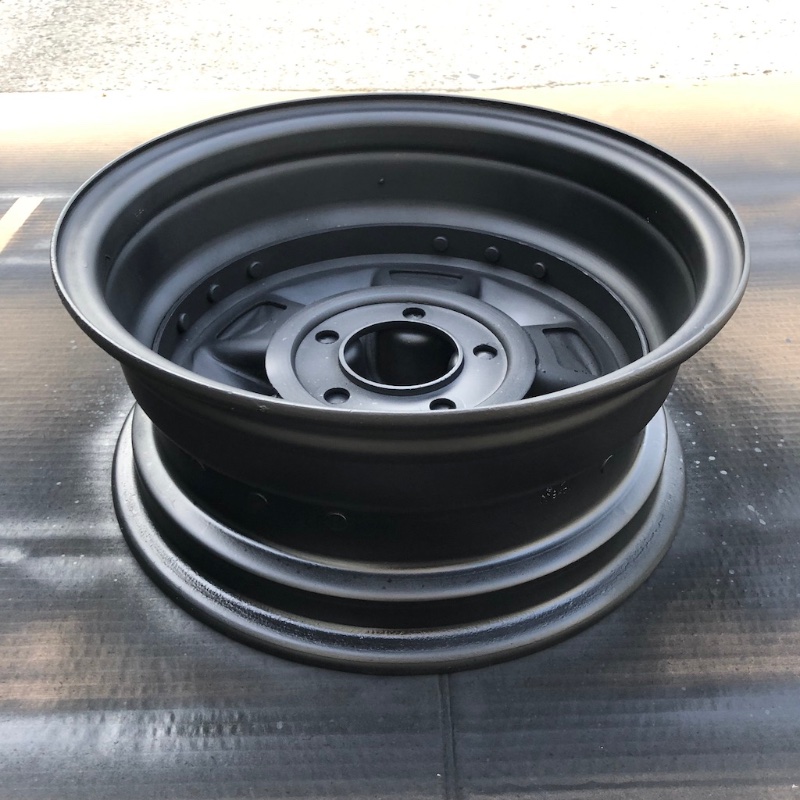
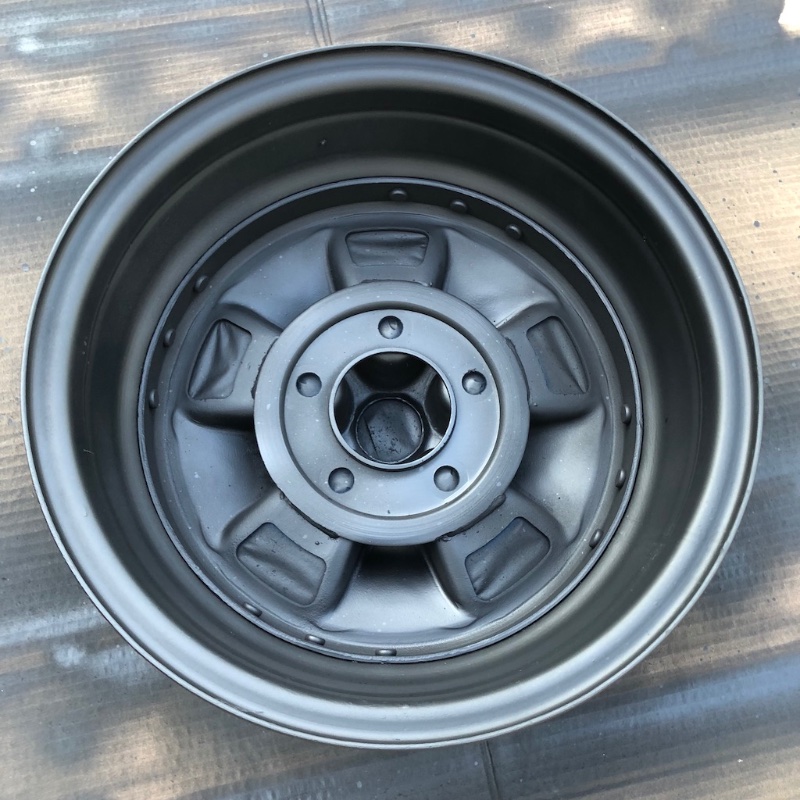
It’s basically a flat black finish, and it looks pretty nice. You can just call it good there, or paint over it after 24 hours. I decided to throw a coat of satin black epoxy paint over the top of it, just for good measure. So that’s what I did, the next day or so. This shot shows you the difference in finish between the epoxy (2 wheels in the foreground, albeit still wet) and the rustoleum stuff (background).
Backs and insides are officially looking good! Next will be on to the fronts, which I’ll save for another day. I just finished up the black outer sections on the fronts tonight, and still have to find the right method for the silver. Open to tips from anyone who has repainted these wheels before! It’s basically tape vs. a rag soaked in thinner to wipe off the edges.
Damn those look good, both before and especially after. That was worth resurrecting this old thread for.
That looks like a very thorough job that will no doubt last a lifetime.
Here’s a link to my post for my wheel restoration attempt https://cccforum.discoursehosting.net/t/healing-heroes-win-the-mustangs/129/1
I don’t know that it’s up to your standards but I was happy with how the argent recessed areas turned out.
Thanks! More to come, this is going to complete my original vision for the car’s look if all goes to plan.
Hey, great job on yours! The masking looks like a pain but I’ll probably end up doing something similar. Rather than removing all the old paint, I think I’m going to just leave it there and use it as a “primer” layer since it still seems to have good adhesion to the chrome. I’m also planning on using the VHT Ford Argent wheel paint, but no clear. I’ve actually used this paint & clear combo before on my Volvo’s wheels, and the clear has turned yellow and started coming off after a couple years. Silver still looks good. It was cold when I painted them so maybe that was the problem.
So to bring this up to speed, here’s how I finished up the black outer section on the front of the wheels. Got them all cleaned and scuffed up, then I had to figure out how to mask off the wheel centers. I figured some sort of cone would be a good way to do this. After some experimentation with scrap paper and cereal boxes and whatnot, I figured out about how big of a circle I would need to get a steep enough ‘cone angle’ to fit down inside the bottom of the crevice.
I went to my local art supply store and got some poster board, then started looking around my house to find anything that was a perfect circle I could use as a template. I was almost thinking I would have to rig up some kind of large compass, then I looked at this little table in my living room. It’s about 18" in diameter and worked perfectly.
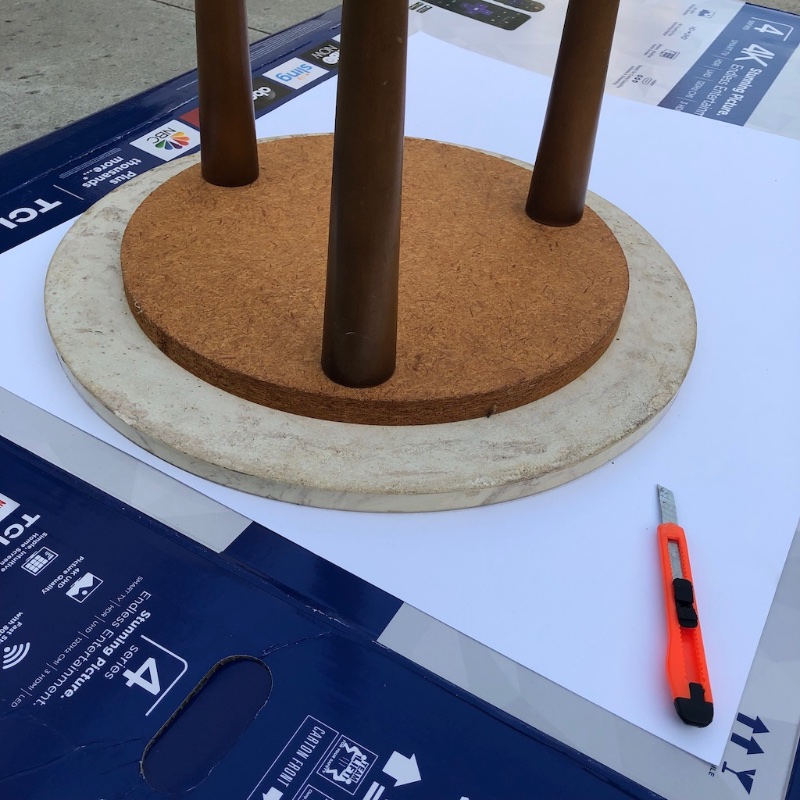
Then I used some geometry to find the center of the circle. No, I did not remember how to do this from high school, but thanks to a quick search on YouTube it all came back.
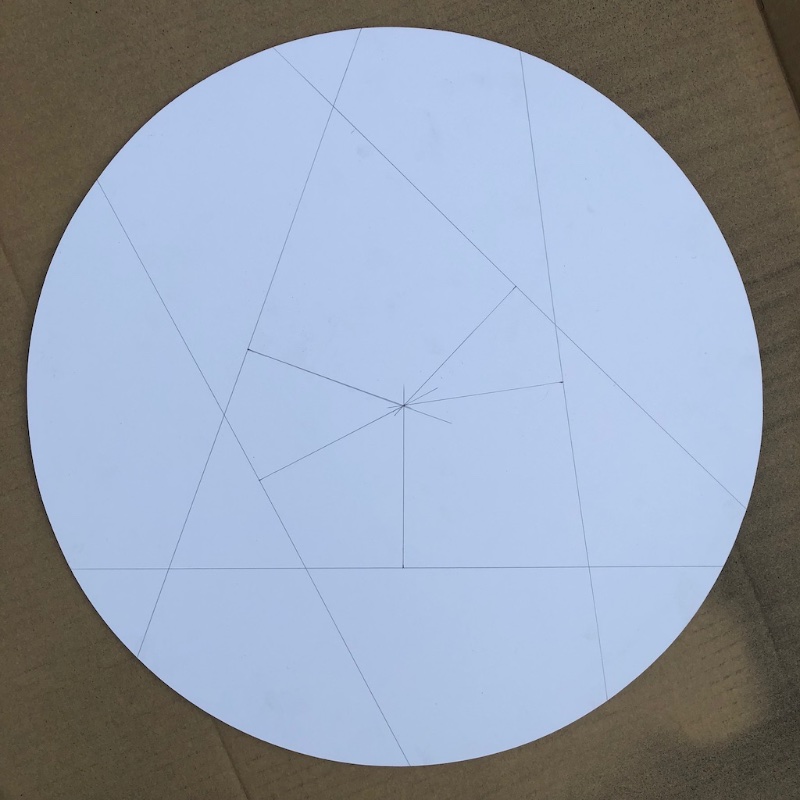
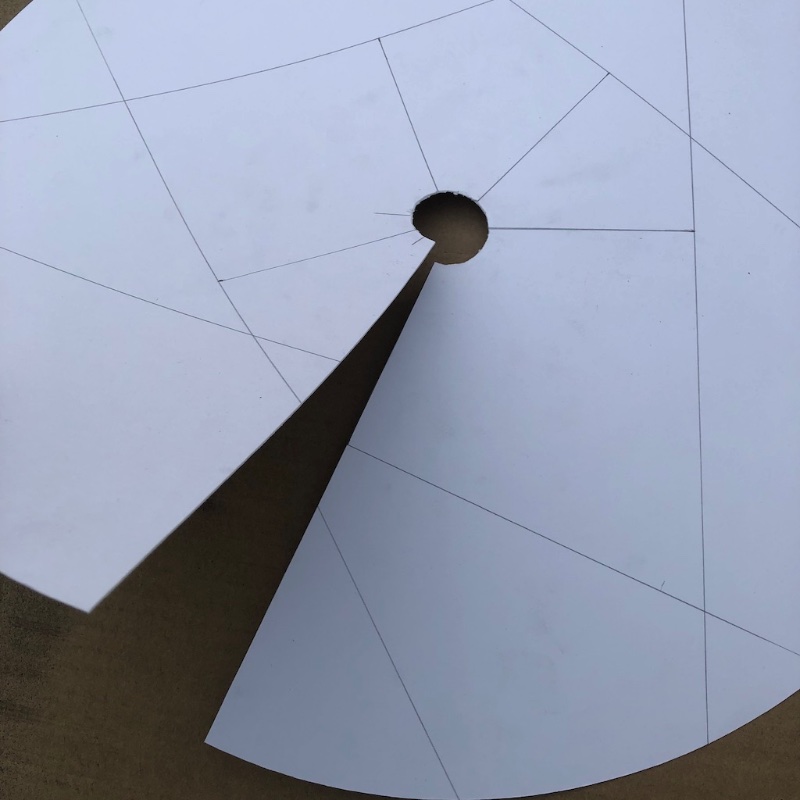
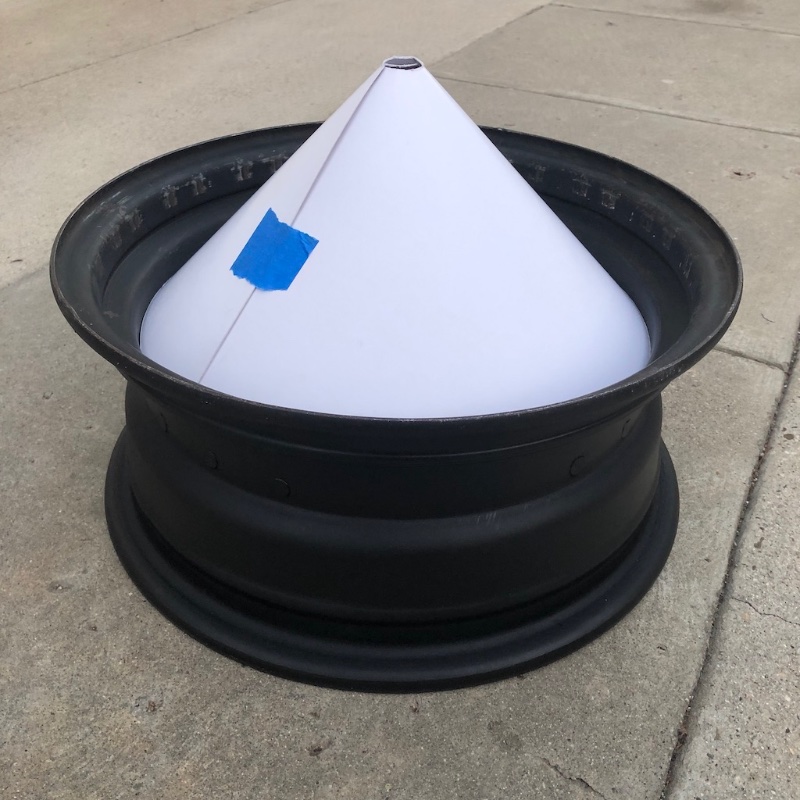
Then I made a relief circle cut in the middle and a line cut, and I now had the makings of a cone.
Next I figured I’d go ahead and use the Rustoleum as a primer coat of sorts, like I did on the backs. There was still some surface rust and whatnot so it seemed like a good idea. This worked out well!

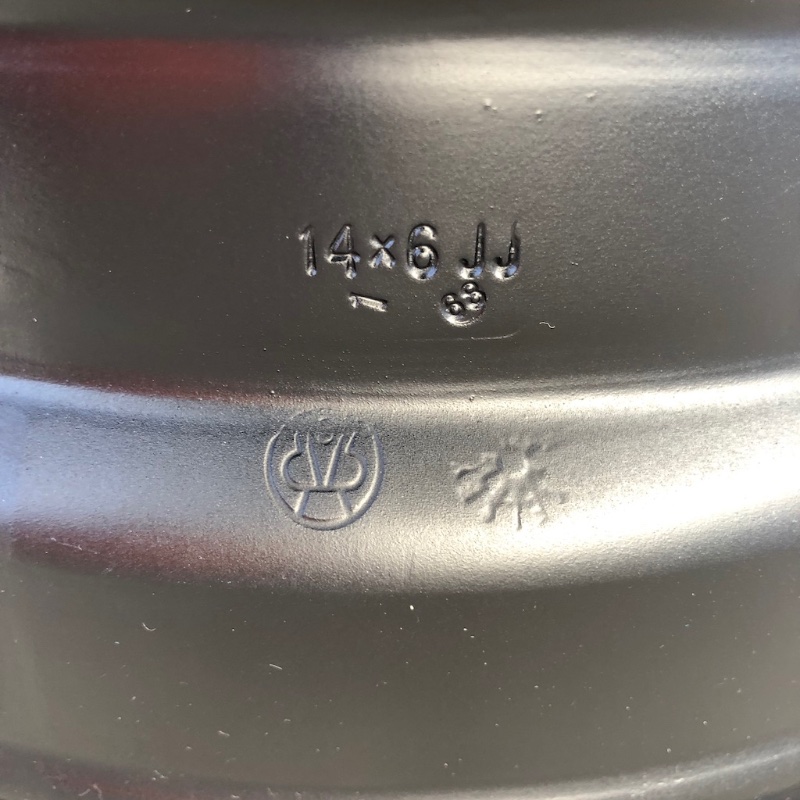
As an aside, I thought it was cool to see these markings.
Anyway, after letting the first coating dry for 24 hours, I went over all the outers with VHT satin black wheel paint. I did two light-ish coats and one medium-wet coat. I sprayed a bit extra along the inner areas to let some of it flow down into the crevice. I would pull the cone out right after spraying to let the wet paint flow down a little. Happy with the results!
Tried to take a pic to show how well the paint covered but it’s hard to see - I guess that’s a good thing! It got down into the crack pretty nicely.
Anyway, these wheels are now way too pretty to put trim rings on and scratch the crap out of my new black paint. What do you think, should I just run them with the black outers?
Silver is next! I’m looking forward to seeing these finished, but not really looking forward to the masking adventure that probably awaits me. They almost look good enough as they are now, but I’m gonna freshen up the silver anyway.
Damn, those turned out really nice! I need to get around to doing mine as well. Maybe this winter I’ll get them prepped to be painted in the spring. Maybe.
WOW! Those '68’s are absolutely gorgeous, Andrew. You’ve certainly got the knack for developing a plan, executing it and getting great results!
As much as I love my Scott Drake Magnum 500s on my '68 Cougar, these are definitely just as nice - and a whole lot cooler!
Good luck with the finishing touches and keep rollin’ that Snowball! ![]()
Looking really nice Andrew!
Personally, I enjoy masking, painting and polishing projects over the wrenching, draining and scraping projects ![]()
Take some nice beauty shots when the new wheels and tires are mounted.
- Phillip
Yours are a bit easier too with the centers being all painted. No excuse now ![]()
Thanks! For being a terrible planner in all other aspects of my life, at least restoring old car parts is something I can usually handle.
Cheers Phillip! I totally agree. I think that shows how a ‘creative type’ approaches car projects differently. There are other folks who are the exact opposite, they like working on the mechanical stuff but hate the aesthetic work and don’t have the patience for it. Glad we can all help each other out. And you bet I’ll be taking some nice pictures when it’s all done!
News update: I just got word that my tires are on the way from Diamond Back, and should be here next week. I’m excited! I need to finish these suckers up and give the paint some time to cure before mounting them up. So with that, on to the silver. Update coming momentarily.
So all along I’ve used one wheel as my “test wheel” to try out painting techniques before doing the other 3. So far it’s worked out perfectly and I haven’t changed anything. But the silver portion is the most complex part, and things are definitely going to change this time.
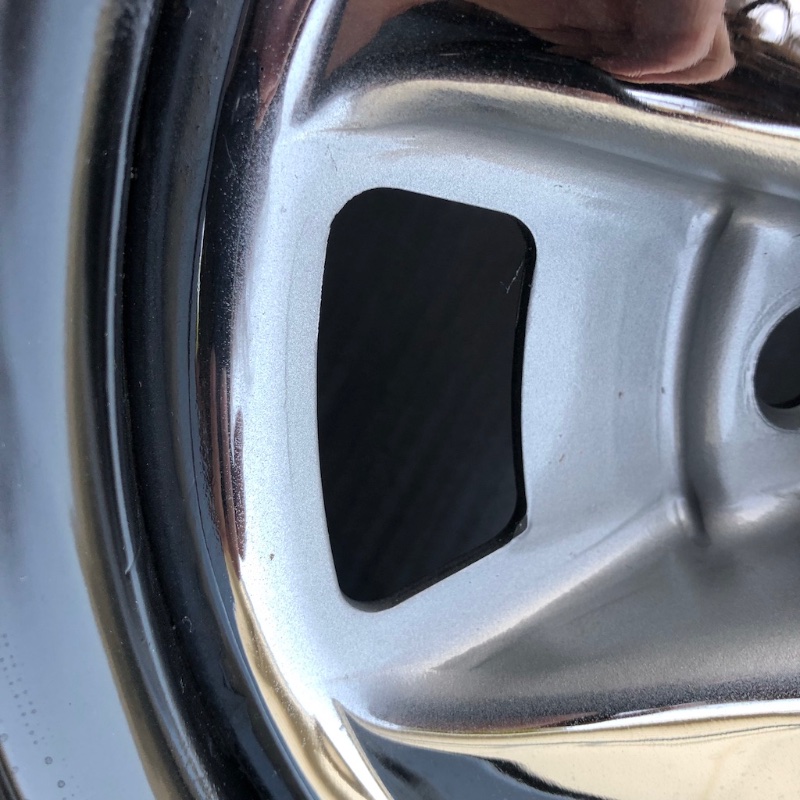
For my first attempt, I thought I would try the “paint everything and wipe away the excess later” technique. This general idea worked out great on things like the taillight grilles, so I had a little experience with it. So I made a masking device for the outer rim, cleaned and prepped the painted areas, and wiped some chrome polish (nevr-dull) onto the chrome in an effort to not let the paint stick well to those areas.
Then I followed the instructions on the can - VHT recommends 2 light coats followed by 1 medium coat. Either I wasn’t light enough on the trigger, or 3 coats is just too much, because this ended up pretty thick. You can see one initial attempt at wiping away the paint while it was still wet.
I dipped a cloth in paint thinner and tried removing most of the excess while it was still soft. It was tough going at first, but eventually got easier.
I stopped at the above picture, thinking that I might be able to refine the edge better when it had a chance to dry more. So I put it aside and started plotting how to do things differently.
I didn’t love this wipe-off technique. It was kind of a pain, and I wasn’t liking the edges I was getting. Part of that is probably the paint being too thick, so I’ll try to address that next time. But also I wanted to try to better replicate what the factory did.
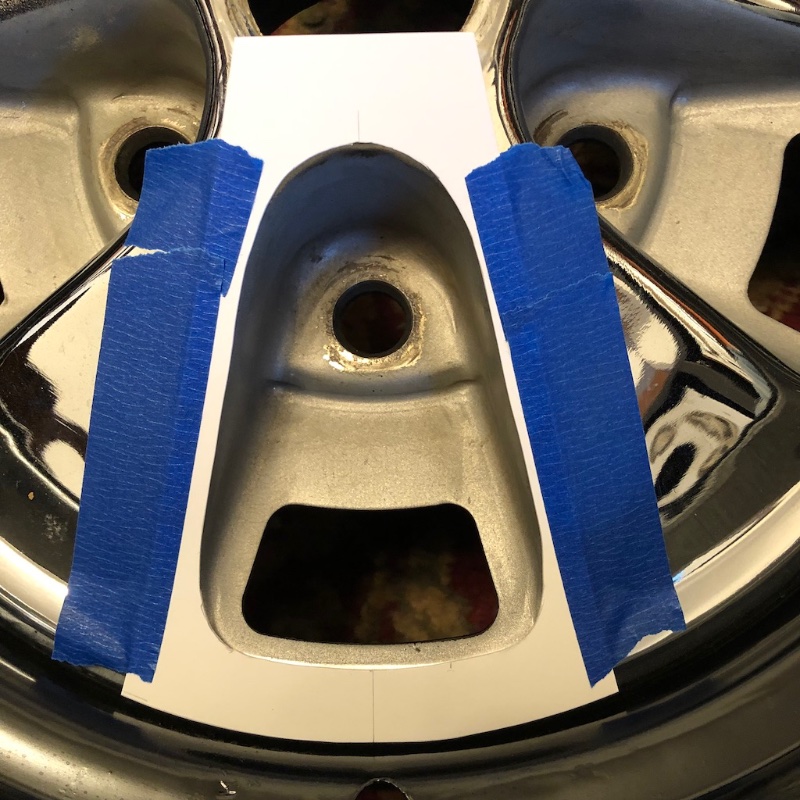
I kind of rejected the most obvious solution of just using masking tape, as the lines would be too crisp and I didn’t want to scratch the chrome with a razor blade while trimming tape. Also it’s a lot of work do to that to every wheel. So I figured the best way to replicate what the factory did would be to make stencils of some kind. There’s no magic way to do this, as far as I know, so I just took some parchment paper from the kitchen and made a rough outline to start with (using a different wheel of course).
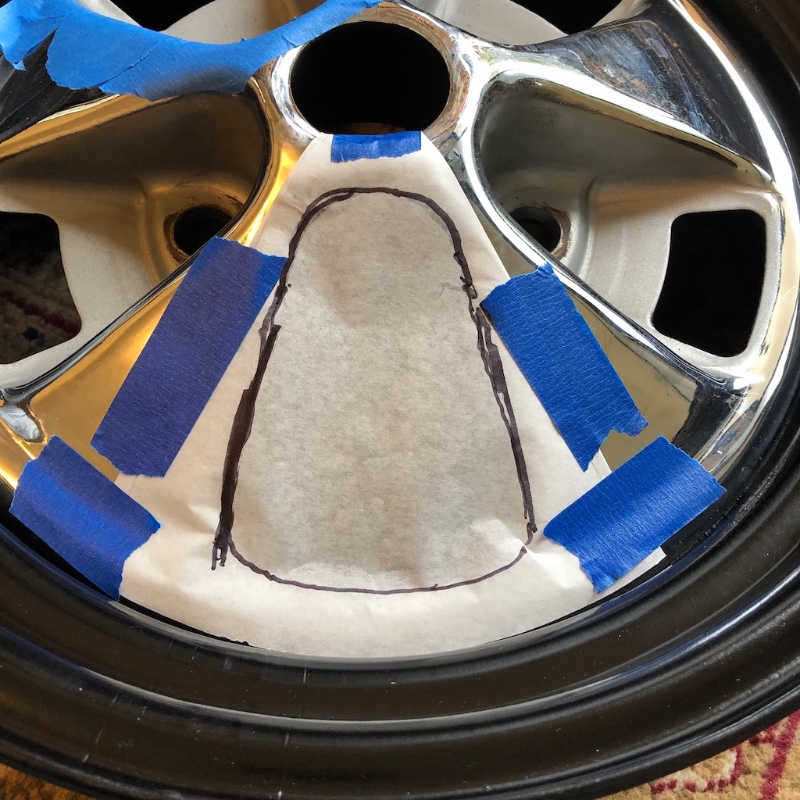
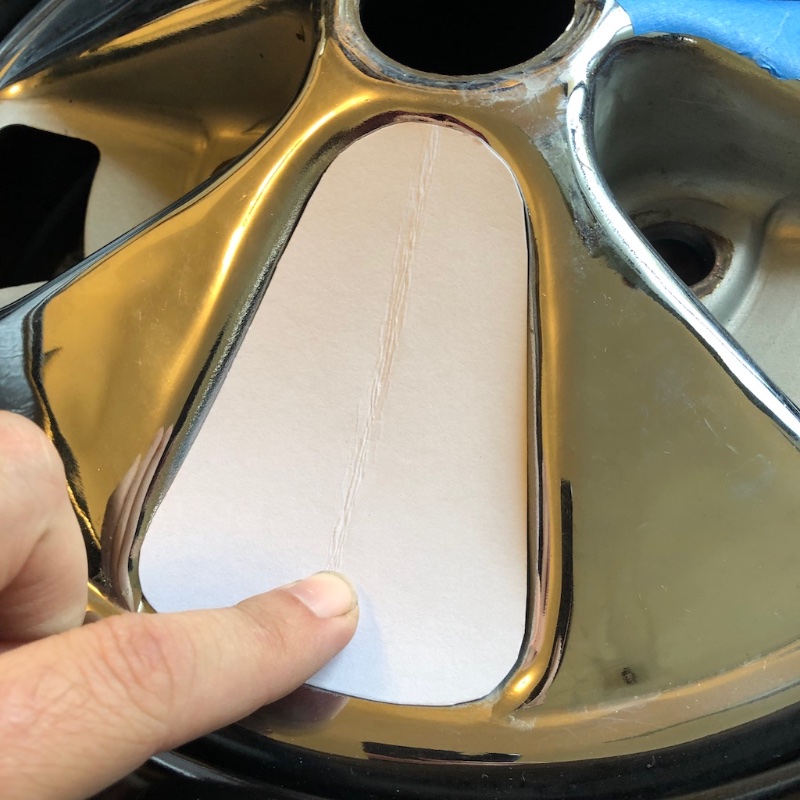
Once I cut that out and got it pretty close, I transferred the shape to poster board and cut it out, then further refined it with scissors until I was pretty happy with it. Folded in half to get it more symmetrical.
Then I used a junk vinyl LP as a template to cut out a circle, about the right size to mask most of the wheel center.
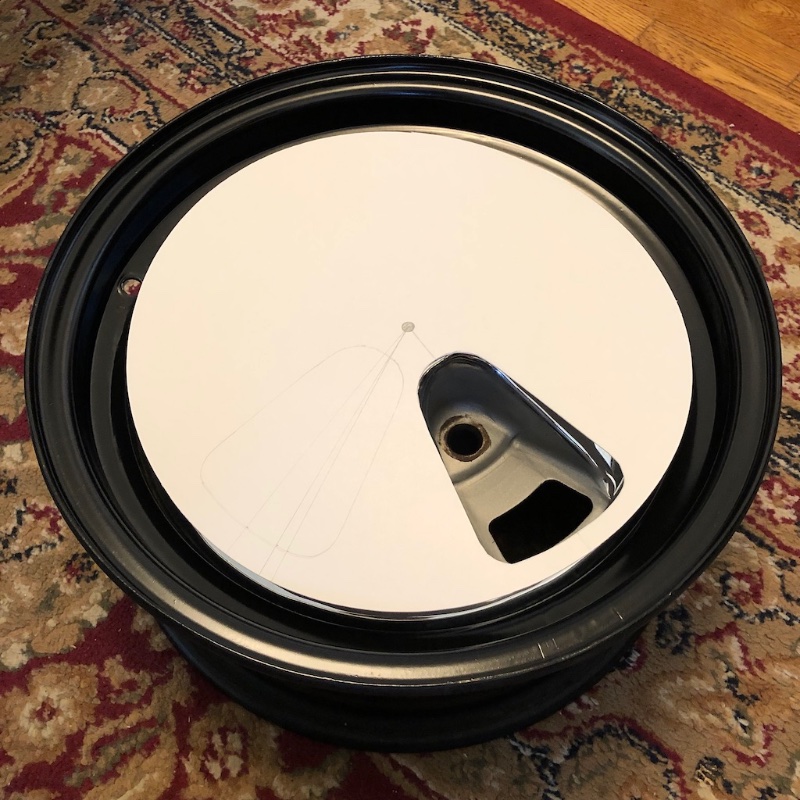
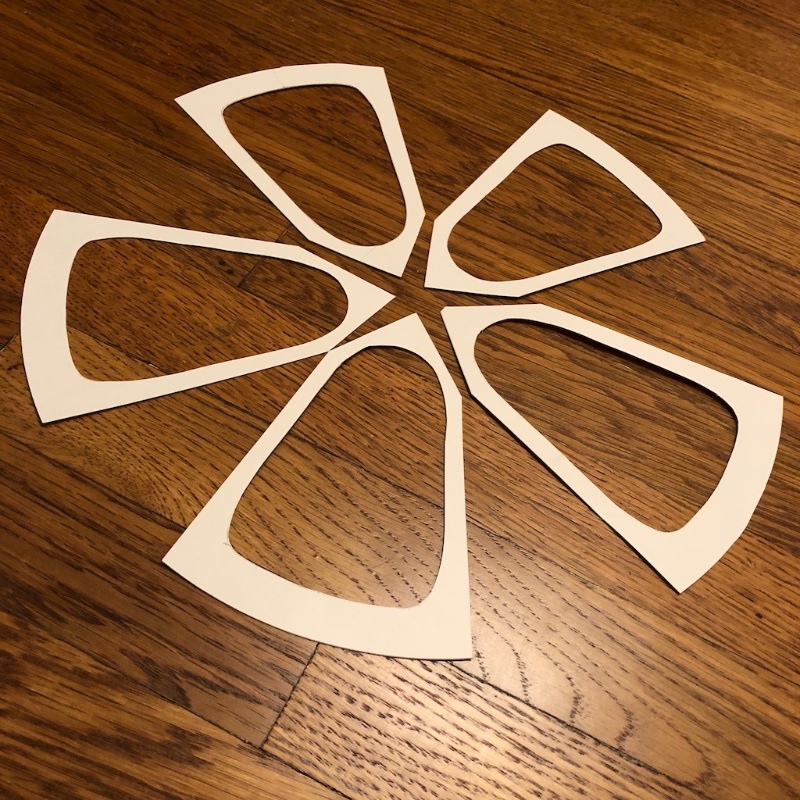
This led to what I’ll call the “Mk. I” stencils.
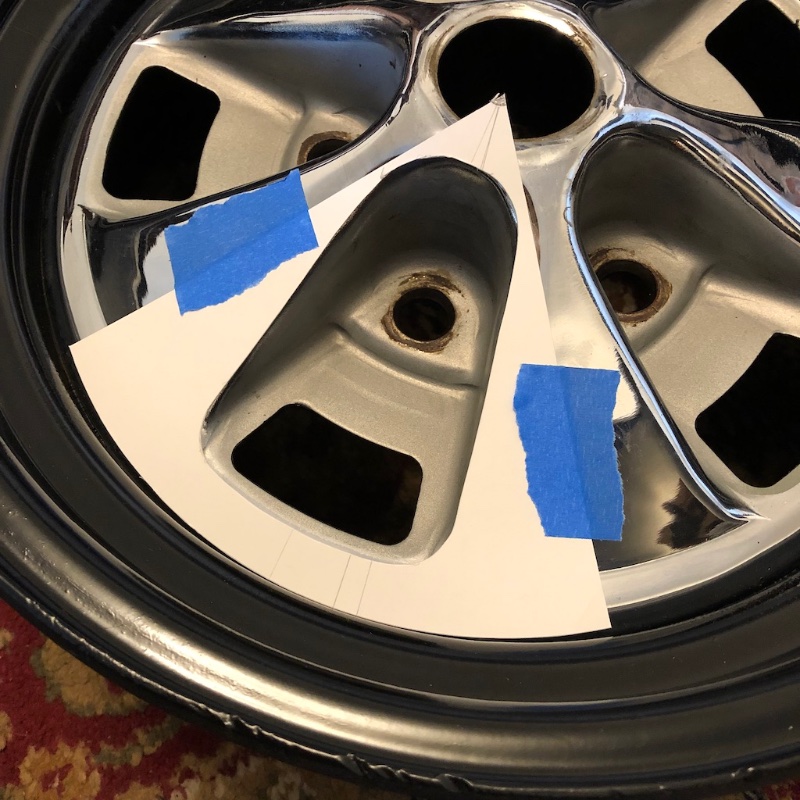
It wasn’t until I made a full set of 5 of these that I realized the openings were a bit too big. The reality is that they need to be a little smaller, because the paint overspray is going to get under the edges. However, there was a benefit to cutting out these “actual size” pieces… coming in next post.
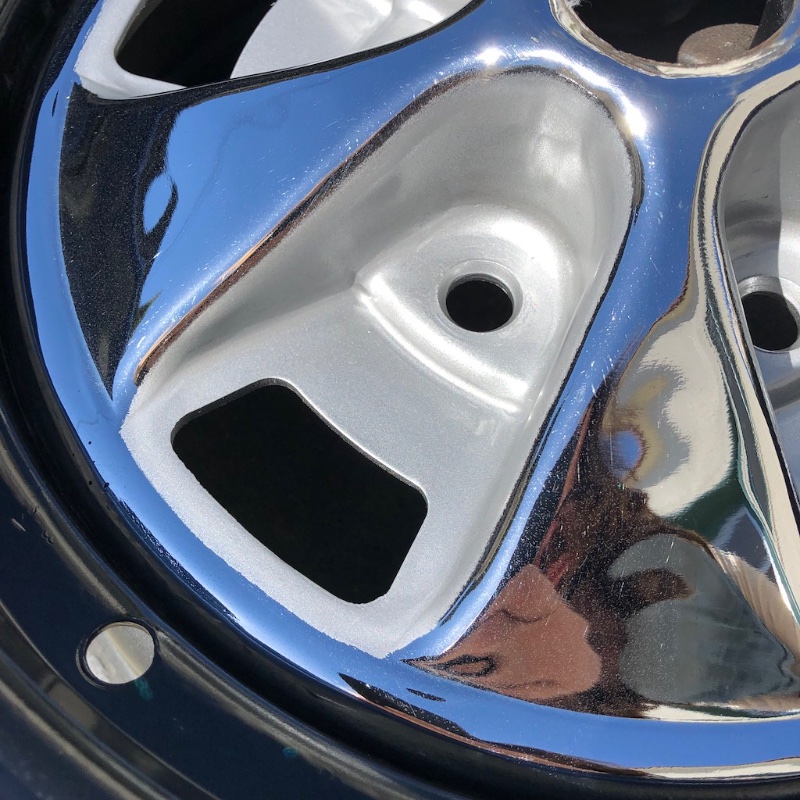
Now that I had these little “positive” pieces, they could help me out on the first wheel. I used them to refine the tricky outer edges. Also I upgraded my wiping juice to acetone.
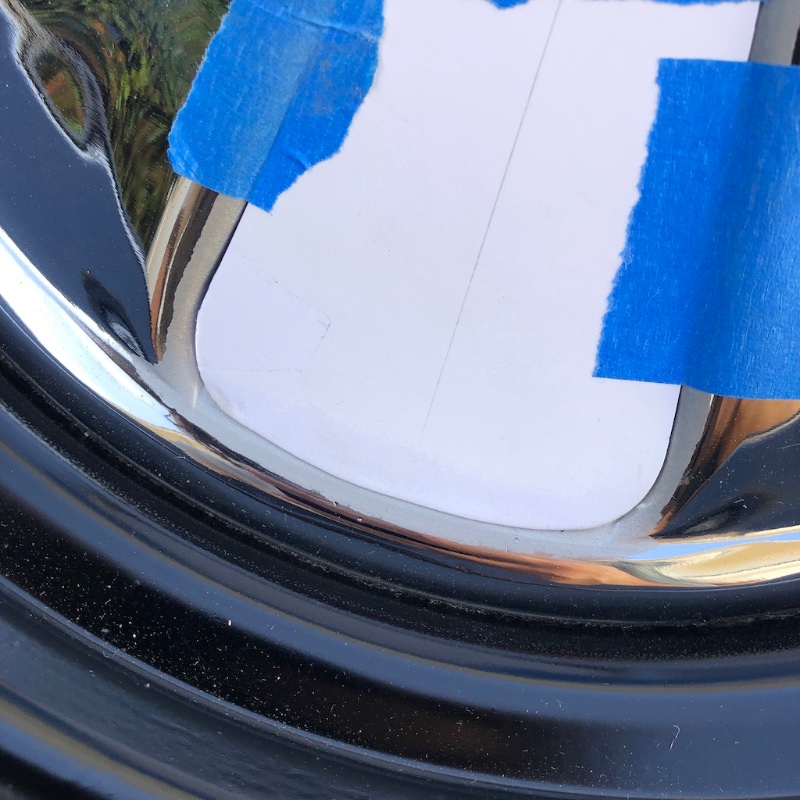


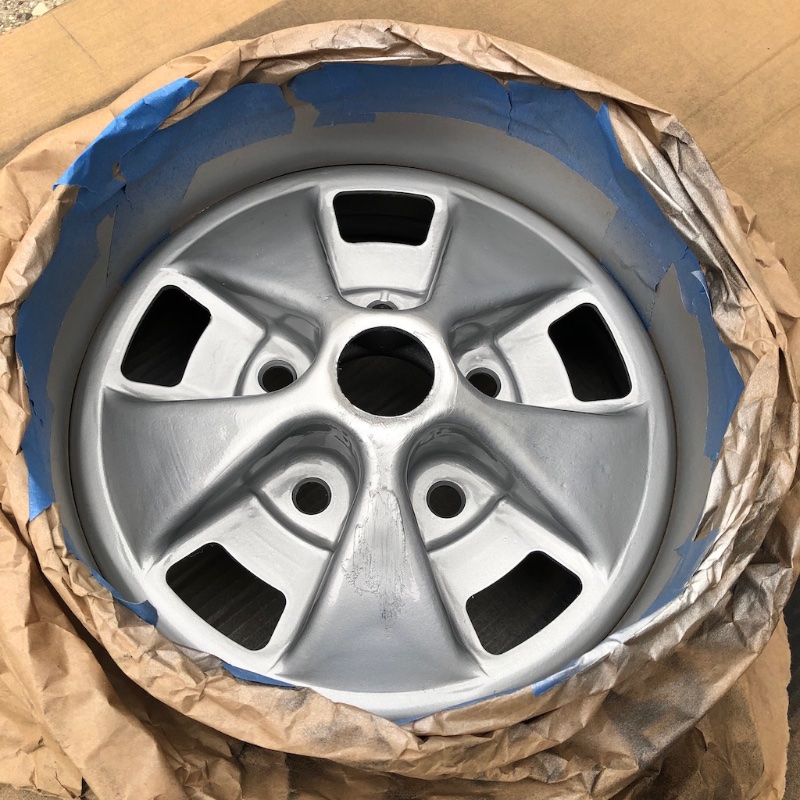
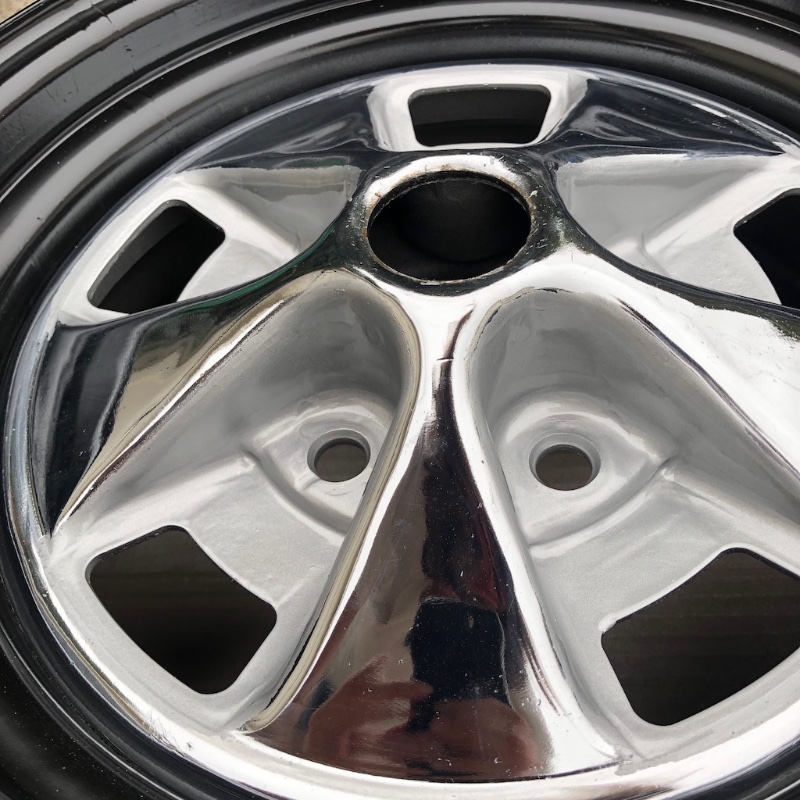
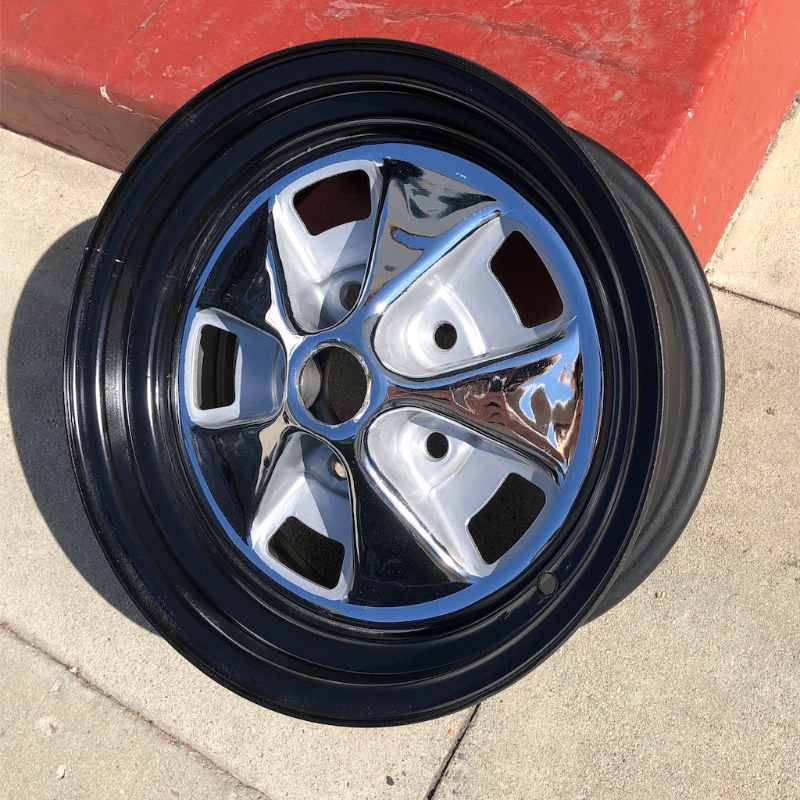
Definitely not perfect, but much closer to how it’s supposed to look. After much painstaking wiping, I could call this first wheel “as done as it’s gonna get”. Here’s a comparison with the original silver (left) and new silver (right). The new silver is a bit brighter.
Here’s a shot in the sun. You can still tell some of the edges are a little wonky, but I can’t complain too much, it looks pretty nice.
Finally, here’s a look at the Mk. II Stencils that I just finished up last night. You can tell that the side edges are in further, and the bottom edge lines up better. The top could still come down a bit, but it’s pretty easy to wipe that area with acetone to remove extra paint, and I’m not super stoked about making a third set.
As of writing, this is up to speed. I’ll probably attempt my next wheel with these today. Fingers crossed!
Dang that looks tedious!
But oh so worth it.
Agreed on both counts!
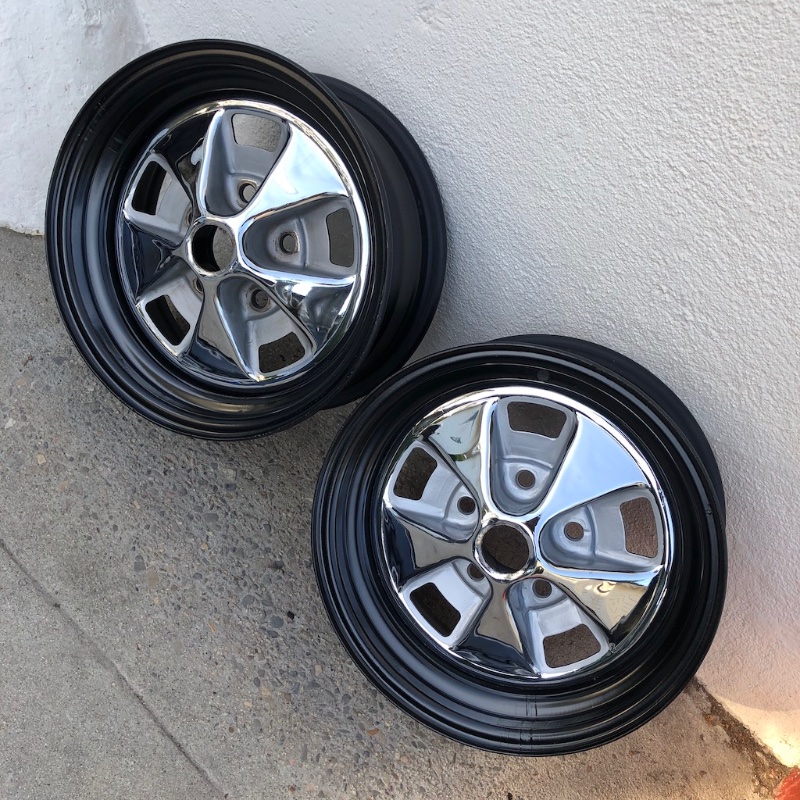
So, the verdict is in: this method works well! Here’s when I was all masked up and ready to spray:
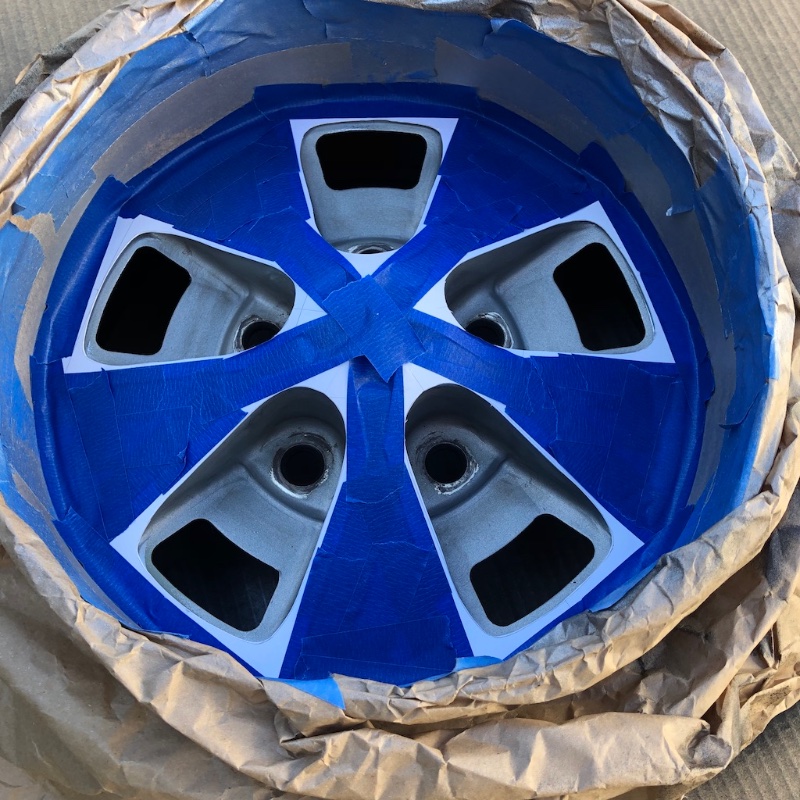
And here’s after the 3 coats. I went much lighter on the first 2 coats especially, and still somewhat conservative on the 3rd, while still making sure I had full coverage.
After waiting a couple hours for it to dry sufficiently, I took off all the masking devices and found I had definitely achieved soft edges. Maybe too soft, but the area was just about right so that I had room to clean it up.

Maybe the best part is that the only cleanup needed was to do a quick pass on the chrome with Nevr-Dull, which took care of the little dots of overspray and helped define the edges better.
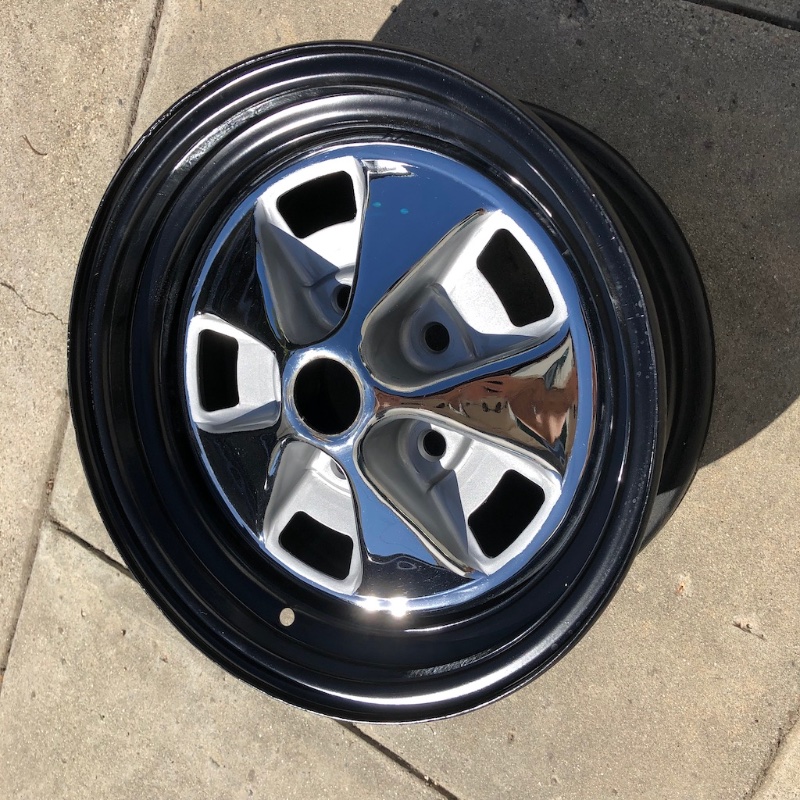
I’ll probably still use one of my little mask pieces to define the lower / outer edges better, which will probably go much easier since the paint isn’t as thick as the first one. I just hope they all look consistent with each other. But I’m happy enough with the method to proceed and do the remaining 2 wheels this way. Just have to do one at a time. It’s nice that these stencils are reusable, it feels like I’m saving time even though it took a while to make them.
So the goal is to finish these up in the next day or so, give them some time to cure, get the new tires mounted next week, and take some nice finished pics. I’ve also entered in my first “real” car show since finishing the resto, coming up on Oct. 10, so I’m looking forward to having these on the car for that.
Now I’m off to paint wheel #3 ![]()
As always, GREAT job, Andrew. Man, these rims are going to look so cool once mounted on the car with those new red wall Diamondbacks! ![]()
Looks correct from here. Nice work.
Thanks! They’re going to be white walls actually, but should look great nonetheless. I’m looking forward to the transformation.
Thanks Royce, that means something coming from you.
Looks awesome Andrew. Can’t wait to see them mounted up. Cheers.