Sprucing up a '68 Cougar

So now onto basic setup and first drive:

Once the motor warmed up, first order of business was to sync the timing. The sniper touchscreen allows you to lock the timing to a static value, say 15 degrees. Now you can use a timing light to rotate the distributor until it also reads 15 degrees. Tighten the bolt down, clear the static timing and the ECU is now synced with the distributor. Amazingly I was only 7 degrees off, so that plastic cap dealie actually works pretty well.

Next up was idle. The sniper controls the idle using an IAC motor, but you need to make sure itā€™s operating in a certain range. Once the motor is up to temp and idling in neutral, they want the IAC values between 2 and 10%. Thereā€™s an idle set screw just like a carb would have on the linkage. This allows you to slightly open/close the butterflies to get the IAC operating where it needs to be. Out of the box the throttle was open too much. Engine was idling really high and the IAC was showing 0%. I had to back off the screw a good bit to get the IAC to start opening.

Overall the system worked really well on the first drive. Idle was very smooth, and for the most part cruising and acceleration felt really good. A couple things I noticed though:
-The throttle was very sticky coming off idle. This made it very hard to be precise and the car would jump when you tried to accelerate smoothly.
-There was a stumble when getting on the gas hard. Like an accelerator pump issue on a carb.
-Deceleration was a bit pronounced, like an engine braking effect rather than coasting when you take your foot off the pedal.

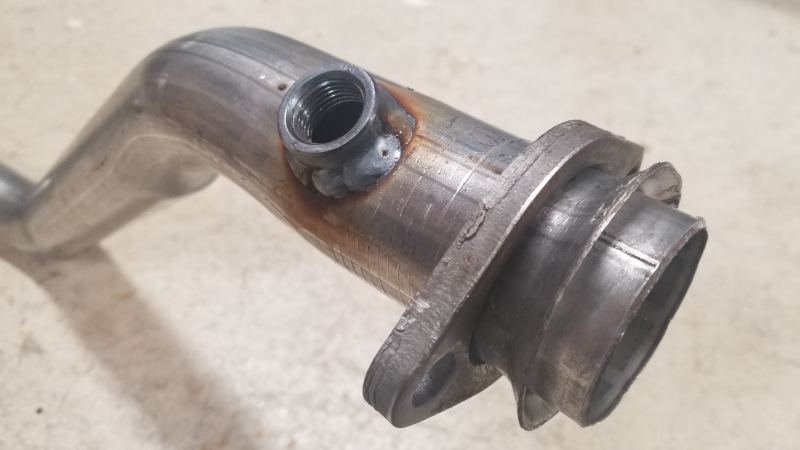
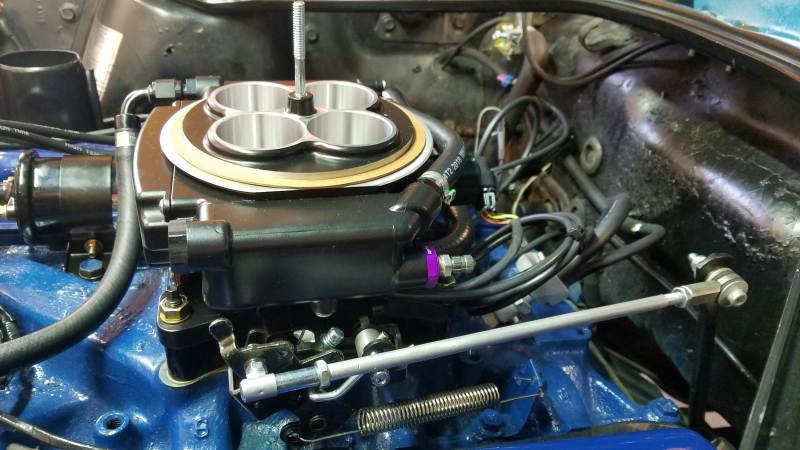
After a few more miles of driving the acceleration stumble and decel issues tuned themselves out completely. To fix the throttle sticking, I had to modify the linkage. Out of the box, the sniper does not have the large 1/2" hole on the top of the linkage that most Holley and Edelbrock carbs do. So I moved the connection point for the rod to the smaller 1/4" hole further down. This hole is closer to the axis of the throttle shaft, so less leverage which translates to more pedal effort. I ended up having to use this adapter to add that 1/2" hole on the top of the linkage arm.


Hereā€™s the old location:


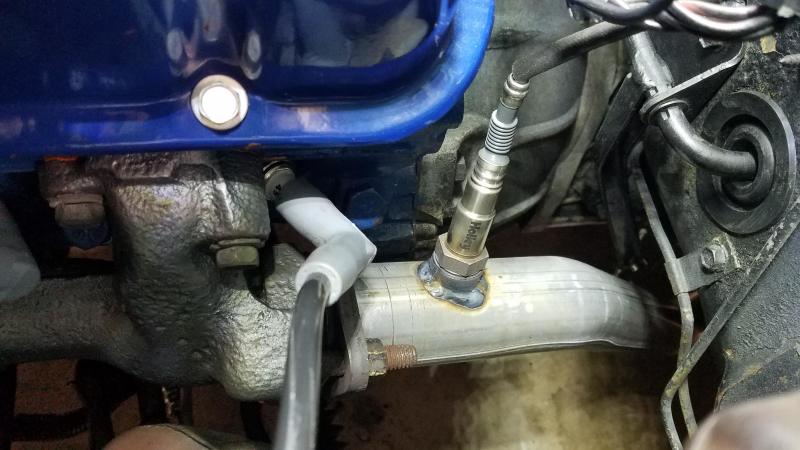
And the new location with the adapter:


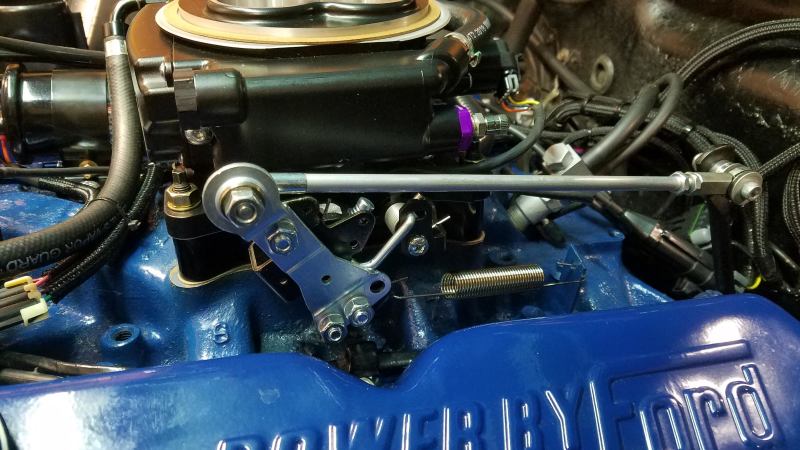
Moving the attachment point up made a huge difference in pedal feel. Went out for another drive and the issue was gone, made it very easy to roll into the throttle now. It actually felt almost too light, so I went back to a double return spring and that seems to be the ticket.

One thing to note with the bellcrank/rod style throttle on the 68s, itā€™s going to be impossible to achieve absolute wide open throttle on the sniper when the pedal is floored. The problem is the shape of the bellcrank, it contacts the intake manifold which prevents you from getting the range of travel needed to be both fully closed off the pedal and fully WOT on the pedal. It does get very close though, the TPS values are only 7% down from true WOT. On a stock 302 Iā€™m fine with that, doubt it makes any noticable difference. To correct this, I think youā€™d need to either bend the upper arm on the bellcrank or possibly switch to a cable setup. I plan on leaving it alone.

Once the throttle linkage was fixed and the unit had a good 25 miles to self-tune, I was really impressed with the drivability. Every condition- cruise, accel, decel, idle, hard acceleration all felt very smooth and refined compared to the old carb. Will need to see how it runs in warmer weather in a few months, but so far Iā€™m really happy with the performance.

Some updates since the EFI install a few months ago. Iā€™ve got about 300 miles on the system and itā€™s working really well so far with no major issues. Hereā€™s some other stuff Iā€™ve been up toā€¦

The exhaust on the car was really poorly installed by the PO, and the hangers were rotting away so I decided to replace the whole system. I didnā€™t have much left in the budget so I ended up taking a chance on a cheap 2" eBay system supposedly made to fit 67-68 Cougars. The shipped price for the entire system including H-pipe was too good to ignore. You can definitely tell itā€™s basically a slightly longer Mustang exhaust, the over-axle bends could be a little better for a Cougar floor pan. But at the end of the day we were able to get it installed ourselves without cutting or modifying anything.

I had the tabs WCCC sells welded onto the turbo mufflers so they bolted up to the factory style hangers (which I replaced with a new repro set):


I wasnā€™t crazy about the old location of the O2 sensor, or using one of those clamp-on bungs again so I also had the exhaust shop weld in a bung to the H-pipe up close to the driverā€™s side manifold:


The exhaust took a lot of playing around to get it where the over-axle pipes were clearing the trunk floor and the leaf springs, but eventually got it there. Itā€™s a more mellow tone than the old glass packs, but still has some rumble. Perfect for me.


A couple other minor things, I ended up switching back to the mechanical fan. The electric ones were simply not powerful enough, if I decide to go back to electric I think a decent set of SPAL fans will be the way to go. But for now the mechanical fan is doing the job just fine. I also replaced the turn signal, side marker and reverse bulbs with WCCC plasma LEDs. Huge difference and took a bit of load off the alternator. Switched out the amber front turn signals for the correct clear lenses as well.


And finallyā€¦car wash time!

Cute little helper. How much did the system set you back?

I was looking for those muffler tabs the other day and couldnā€™t find them. Nice to know they exist, I have to pick up a set. Im building my exhaust using the repro 2.25" h-pipe and the summit cougar exhaust kit. I believe it will be a cut and fit affair but Ive got a welder so should be easy. Im going to add a bung now and plug it so its ready to go for efi later.


Thanks for the EFI update. Ive been researching lately and liking the sniper system like you have installed. I found they now offer an intank pump that supposedly does not need a return , the pump does it in the tank so its a one line hookup. If it works well that would save me from having to replace my newish fuel tank

$240 shipped including H-pipe. Comes with junk universal hangers so factor in another $120 or so for decent repro hangers and muffler tabs if you go that route.

Hereā€™s the muffler tabs:

Yeah holley released that in-tank module for mustang/cougar right after I finished my fuel system up. If that was available at the time I definitely would have gone that route. No fussing with return lines or external regulators.

Was able to take the Cougar out to the first car show of the season! Looking foward to Carlisle in a few daysā€¦


While you guys are on the topic of exhaust/mufflers, Pypes is the first to step up with a 2.5" X-Pipe high-performance exhaust for the '67-'70 Cougar. Itā€™s all stainless and you get a choice of Pypes mufflers, or you can purchase the system without mufflers and use what muffler youā€™d like.
https://classicmusclecarexhaust.com/c/quick-search/ford/cougar/pypes

I was lucky enough to find a decent steering wheel pad at Carlisle, so I decided to finally tackle the steering wheel.

I started with cleaning up the pad I found and the vinyl insert from my wheel and painting them with SEM Landau Black:

I picked up a used emblem from WCCC, sprayed it with argent silver and then hand painted the black with detail brushes:

The wheel itself was in bad shape and cracked, so I ended up going with a new black repro wheel. My horn ring only had light pitting so I sanded that off and painted it argent as well:

The chrome on my bezel was heavily peeling, so I peeled the remainder off by hand. Several thousand paper cuts later got it down to bare plastic. :wall: The steering wheel pad I found was much better than my old one, but still shrunken a bit so the bezel would not sit flush inside. I sanded down the ends until I could get it fitting relatively well:


I later realized the emblem should be more of a pewter color, but it still looks way better than the old cracked wheel.


Next on the list to tackle was rear suspension. I got a set of leaf springs and hardware from ESPO. I really didnā€™t want my Cougar sagging in the rear so I ordered them with a 1" lift. Also did KYB Excel-G shocks to match what I put in the front suspension. While I was back there I also decided to replace the axle brake lines and hose. They looked pretty old and were in the way of removing the U-bolts anyway.

I replaced them one leaf at a time without pulling the rear axle from under the car. It could use a good cleanup and going-over, but didnā€™t want to get into that right now.


I sand blasted and painted the shock plates cast iron grey


So at first the springs seemed a bit too high, this was taken right after I finished up the install. But after driving around some and sitting with a full tank of gas they have settled down a bit. Probably still a smidge higher than Iā€™d like, but Iā€™m not switching to coil overs so Iā€™ll live with it.

As youā€™d expect, the ride and handling were markedly improved from the new springs/shocks and bushings.

Very nice build. I have a Sniper going on a Cleveland in my 67.

Just as an FYI to any one following this thread, the Ebay exhaust vendor (ClassicMustang1980) seems to have gone under. They still have auctions up but donā€™t respond at all or ship product. Any one know who was making the exhaust systems for them?

Thatā€™s a shame, it was a pretty decent-fitting system for a great price. Between this and mustangs unlimited weā€™re losing Cougar vendors all over the placeā€¦

The Sniper has worked out great on my car, I think youā€™ll be happy with it.

I really wanted to take my little one for rides in the Cougar, which meant figuring out how to get her car seat installed. I decided to rip out the original 50yr old seatbelts and replace them with something newer and safer. I knew that when she gets to booster seat age I will need a 3-point setup in the back seat, so I decided to just put that in now. They donā€™t exactly look period correct, but these seemed to be the best option I could find:
https://www.cjponyparts.com/seat-belt-3-point-retractable-with-push-button-rear-pair-1965-1973/p/SBR8-V/

These werenā€™t too bad to install, thereā€™s already holes in the package tray sheetmetal for the retractors so it didnā€™t even require drilling through the body. Just to add some safety/piece of mind, I also installed a top tether mount in the package tray area for the car seat to hook onto:
https://midwestbusparts.com/index.php?main_page=product_info&products_id=5510
It uses similar hardware as seatbelt kits, I drilled a hole through the package tray metal near the speaker grille for the mount, and painted it black so itā€™s not so obvious to the casual onlooker.

The existing package tray was spray painted cardboard with rotting insulation underneath, so I decided to replace that while I was in there. From what I understand, the original package tray would have been something close to Masonite board painted to match the interior. I figured I would go a step further and add some black vinyl upholstery (got the idea from this video). Since my existing piece was worthless I ordered a template from WCCC and cut a 1/8 masonite board to size. I then covered it in some foam headliner material, followed by black vinyl. I also replaced the sketchy speakers with some decent Alpine 6x9s and got a new set of speaker grilles. Itā€™s not concours correct by any means, but I think it came out looking pretty tasteful.


I also decided to install the WCCC steel trunk divider, since it helps correct numerous issues. I sprayed it black just to keep it from rusting over time, and then covered the back seat whole area in sound deadener.


After doing all that, I couldnā€™t bring myself to reinstall the side panels with the ratty looking yellowed trim inserts. I ended up removing the basketweave inserts from the panels to make it easier to work on them. So the chrome trim around the basketweave is chrome vinyl covered by a thicker clear vinyl/plastic layer (what actually turns yellow). I used a heat gun and a razor and carefully removed the clear vinyl layer. I then masked off and painted the trim with Spaz Stix mirror chrome. Itā€™s not a 100% chrome look, but itā€™s close enough for me and it looks better than it did so Iā€™m happy with it.


Since I did new 3-point belts in the rear, I decided I might as well do the same up front. After reading through this thread I decided to go with the kit which has the long sash guide for the shoulder mount. The idea being that lowering the guide closer to the passenger will prevent the shoulder belt from riding too high and cutting into your neck. By far the hardest part of the install was getting the upper mount installed, since my car came equipped with lap belts only. Thereā€™s a provision in the sheetmetal for it over the rear quarter window, but itā€™s not threaded. So I had to pull the windlace off and carefully pull back enough of the headliner to get my hands back there and get the threaded backing plate in. I then figured out where the bolt should pass through the headliner and cut a small X to pass it through. Once I got the hang of it on one side, the other wasnā€™t too bad. The retractor needed to mount to the floor, so I pulled up some carpet to find a suitable place to mount the bracket. Once I was sure I was in a solid location and not above any brake/fuel lines I drilled the holes. I then cut a small slit for the top side of the bracket to pass through the carpet.


After that, the 3rd point and the buckles simply bolt in to the existing seat belt mounting points. Since these belts are retractable and the pockets in the center console for the seatbelts will no longer be used, I got one of those cupholders that sits in the pockets.


Once I was done with everything I gave the carseat a try and it works great.


Thereā€™s not a ton of info out there on seatbelt upgrades and car seats in classic Cougars/Mustangs, so hopefully this post will help someone out down the road.

Nice work! I like the seat belts.

Thanks for posting. I have been thinking about how to upgrade the seat belts recently too and actually wondering about car seats. I have a 2 and 4yr old so still lots of time in car seats left for them and would need something back there if they wanted to ride along. Nice work on the tether too, I bet you could find some factory ones with covers to hide them even further if you wanted.

Nice work and all looks reversible if you ever decided to go back to how it was. I like the covered package tray too, I planned to cover mine like that as well.

Thanks guys. If this were something rare like a GT-E or Eliminator I probably wouldnā€™t make all these changes, but Iā€™m working with a standard 302/auto which I drive all the time. Iā€™m all about making the car a bit easier to live with for myself and passengers.

Very inspirational thread! I was looking at the steel brace. I assumed it needed to be welded in but looks like you just bolted it up. Is that the recommended method? So I may reconsider it. Mine is kind of rare so I donā€™t want to make big structural mods unless they are well hidden.

Iā€™m sure welding it in would add more stiffness to the body, but it will be nearly impossible to change out your rear shocks if itā€™s not removable. I installed mine with sealant and self-drilling sheet metal screws.