Anyone here have experience with one of these kits and if so what is the difficulty level? My original one broke last season and I need to get it fixed or I’ll be driving down the highway with my left turn signal going like all the other old folks around here. It isn’t obvious to me how this repair is installed. An instruction diagram or something might have been handy to see but I have not been lucky enough to locate one.
I’ve put the whole switch in, TWICE, because I seem to like doing things twice on this car…but never just the cam-fixit kit. Might try giving WCCC a call, bet they could explain it to you.
I replied on MCnet to this question but have not had a chance to look at the unit I bought. I think it might have been from Advance Auto, so good chance that it too has no instructions?
I grabbed the Dorman version of it from O’Reilly’s today. I’ll fool around with it and see if I can make heads or tails of it. For $9 I thought it would be worth a try. I printed the picture of the Drake version and comparing it to this Chinese made version I can’t see any difference in anything. When I get the time I’ll see if I can actually make use of it.
I was going to offer a free one if you did a write up but would be just as happy to give yo an in-store credit for a few sentences good or bad. I do not hear much good about them.
Feel free to go ahead and send one, at a minimum I can compare the difference between the Drake part and the Dorman part. The Dorman part for sure is pretty low quality. The plastic on the part is softer than the original part, and the part has a warp to it that keeps it from laying flat and engaging the switch properly so I don’t think it will work without a lot of fine tuning with a file and maybe a torch.
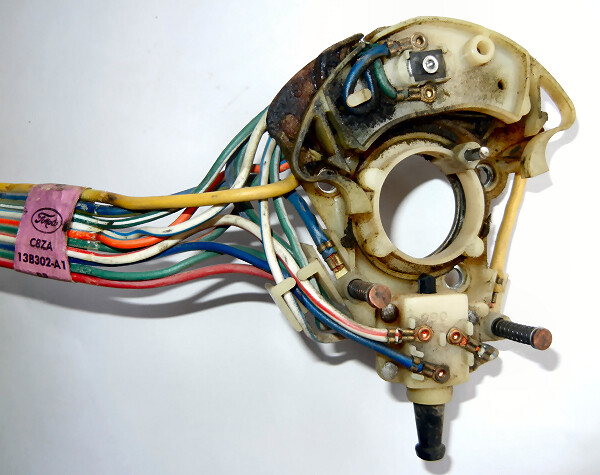
Here is a quickie “trip report” of my turn signal repair adventure.
First, The Broken Switch:
In a weak effort to save a little time I purchased a Dorman part from the local O’Reilly’s auto parts store, right at $10 for the part. The Dorman part when compared to photos of the Drake part looks to be quite similar in build (see photos below). I’ve never seen the actual Drake part in person so do not know if it would work the same or better than the Dorman part. I would hope it would be better but just do not know. DORMAN: DRAKE:
When I got the Dorman part unwrapped and inspected, it was my observation that it was not made from the same plastic material as the original switch. The original switch is a more stiff (harder) plastic then the Dorman re-pop part. The next thing I noticed was the Dorman part had a warp to it, it did not lay flat on a flat surface. With this in mind I continued with the install. I tried repeatedly to get the part to engage like the old switch with no success. Thinking the warp may have been the problem I clamped the Dorman part to a piece of aluminum and using a little torch heat warmed it up enough to get it to flatten. Even after successfully flattening the part the material it is made of proved to be too soft and too flexible to properly engage on the original switch base. Close as it was to clicking into place no massaging of the part using a file, exacto, and other methods had any effect on getting the part to engage properly. The DORMAN Warp
I gave up on the Dorman part and looked for a complete switch replacement. Apparently there are 3 ways to go here; (1) NOS, (2) Scott Drake’s copy or (3) Daniel Carpenter’s copy. I originally thought all the re-pops were Scott Drake’s but learned differently while researching it online. I was able to purchase the Daniel Carpenter copy for $75.95 shipped to the door. It turns out the Daniel Carpenter copy is made on the original tooling and is made from the same material as the original part. Extremely similar in a side by side comparison with very few differences - using a screw instead of a rivet to hold the signal cam in place for example. I have not seen the Scott Drake part in person so do not know how it compares in quality to the Carpenter switch. Daniel Carpenter Switch
Installing the Daniel Carpenter switch is really quite easy. You of course must remove the old switch then feed the wiring of the new switch through the steering column. There are 10 wires to run through the column. I used a thin but stiff bailing wire to run through the column first, then taping the switch wire leads to that I was able to pull the wire bundle through the column with very little resistance. Once the wires were through the column I installed the new plug end provided with the switch. One could use the original plug end I suppose if that is preferred to maintain original color. New wire plug end New switch installed in Column
That’s pretty much the quick version - put the steering wheel back on and take it out for a test drive of course The Daniel Carpenter switch worked like a dream and the construction is good, I wouldn’t hesitate to recommend that version as a replacement if you find yourself in need of a new switch.
Quick Update; The Daniel Carpenter repop switch just broke the other day in the exact same place the original switch broke. This car isn’t driven that much so this is not what I would call lasting very long. Perhaps I’m cursed…
This is interesting and came at a good time as I just finished rebuilding my steering system.
Looking at your first photo above, I see that the cams have grease on them. I vaguely recall that the cams on my switch seemed to have a larger build up of grease and dirt than other surfaces. I also have a switch from a donor column and it, too, while very dirty, shows evidence of these cams being greased:
My original switch was still functional but dirty when I did the tear down: there was a fine layer of oil residue on everything and lots of desert dust had worked its way in. I actually cleaned mine in an ultrasonic cleaner, using a soft-bristled tooth brush to break lose the larger bits of oily / greasy dirt. I figured full immersion of the switch (but not the entire harness) would be OK because it would be out of the car for quite a while and our (typically) low desert humidity would allow the insulated wires to wick & dry thoroughly. (Plus, I’ve been known to run laptop keyboards through the dishwasher to clean 'em up!) Anyhow, it came through the cleaning all sparkly and pretty and still very functional.
I re-installed it earlier this week and discovered over the past two days that it’s much more difficult to move the turn signal lever into either left or right positions. There’s a distinctive “snap” (vs “click”) when it engages. Sometimes the right side also has a less distinctive pre-“snap”, too.
I see in your replacement install photo that your cams went in dry. Mine did, too. Given what I’ve seen now --paying closer attention-- I’m going to go back in and add a little Motorcraft Multi-Purpose Grease Spray (XL-5-A) to the cams and see if that doesn’t improve things.
I see in your replacement install photo that your cams went in dry. Mine did, too. Given what I’ve seen now --paying closer attention-- I’m going to go back in and add a little Motorcraft Multi-Purpose Grease Spray (XL-5-A) to the cams and see if that doesn’t improve things.
there was actually a pretty good amount of grease on the new switch - it just was not dirty and did not show up in the photos.
SheeMar in Ft Collins makes the repop from original tooling. They have provided this for years.
I don’t buy the relabeled parts( just no need for middle man). I have not had any issues w/ the SheeMar products, but not sure if there are other Mfg’s of this item.
I’ll know soon as a new switch in going into a 68 that is here for inop system.