My 68 xr7 kick panels have perforated sections that I always presumed were for factory speakers but when I went to install some new speakers tonight I found that there are no openings in the metal behind each grill. What voodoo is this?
Yeah, you would have to cut the hole out of the metal where it’s indented and get a pair of those original “pods” mentioned above. Or, you could do what I did and get the repro kickpanels with speaker “bulges.” I can’t say I love the way it looks, having the speakers in plain view, but maybe painting the grilles would make them blend in better. My original kick panels were cracked / broken anyway. If yours are in good shape, don’t throw them out!
Here’s a pic from a couple years ago to give you an idea:

Hidden would be nice, but at the time I really didn’t want to cut holes in the car.
Mine had the factory pods. I still used them even though the repro kick panels didn’t have the perforations.
On my wife’s Olds Vert, I modified GM A-Body kickpanel “bulges” to fit and then painted the grills to blend in better. It worked out as good as can be expected. You can kind of see it in this pic. The guy at the upholstery shop that put the new top on had multiple questions from customers wanting to know where I got them.
Painted to match grills definitely hides them better…
Those kickpanels with the bulges don’t look that bad, and might even look factory with the right kind of grill. But I’m leaning toward firing up the sawzall.
The right way to do this is to remove the fender and cut the opening from the outside. The location is clearly visible with the fender removed.

The cut out is not round, and the factory enclosures won’t seal right if you do try to make a round cut out.
I made a template out of blue tape to make the location for the cut out. The two sides of the car are mirror imaged so you need to keep that in mind. You use one side fo the template for the drivers side and then flip it over to do the passenger side. The screw holes and the up arrow will help you keep it all straight.

This shows the shape of the cut out.

This is what it looks like once you have it cut. DO NOT just mount a set of speakers in this location with the magnet hanging out. Speakers need an enclosure to sperete the front and rear wave so they do not cancel each other out, and also the rear of the speaker will be completely exposed to the elements and will regrade very quickly.

The enclosure installs from the inside of the vehicle and it should look like this. You may need to install the driver side enclosure, then install the speaker in the enclosure if you have a clutch pedal in the way.

Bill, that is an article waiting to happen. WRITE IT!!
Thanks Bill! This is what it’s all about!
I can also write about how to do it the wrong way! When I was 16 I had to get a chunk of steel removed from my eye when I tried to cut out those speaker openings in my first '67 Cougar, while laying on the floor board using a partially disassembled (so I could make it fit) jig saw.
Hey, we can learn from others errors, too!!!
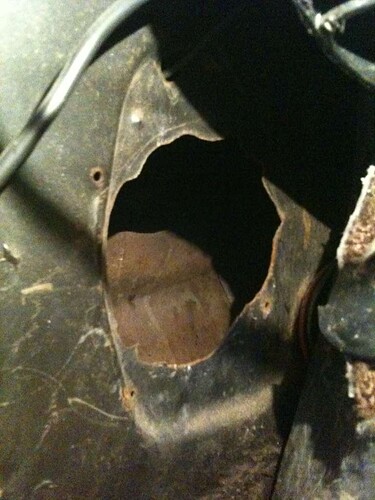
Turns out someone before me apparently tried this approach and left a jagged mess of a hole in each side, just large enough for a magnet or small speaker to fit. Fortunately, judging by your pics, the factory opening is larger so I should be able to salvage both sides. Not sure I feel like pulling fenders off, though. Thanks for posting those pics- I never gave it a thought that the back of the speaker would be open to the environment.
My 67 has speakers in the panel behind the kick panel. I wonder if they were factory? They aren’t the original speakers, so I might not have pods behind mine which would explain why the speakers look like they have been sitting outside…
I ordered the kick panels with the pioneer speakers from WCCC and they are waiting for me to get home to install. So I might be doing some patch work to those speaker holes in the steel if they weren’t original.
Holy smokes!!
With that cut out, I’m surprised you don’t have fender damage from whatever saw they used hitting the blade against the outer skin.
Looks like the 7 o’clock position is where the cuts didn’t line up so the piece got bent back and forth until it broke.
I’m going to try to clean it up from the inside using my air saw. It’s pretty good for cutting in tight places. Bill is absolutely right as to the best way to go about it, but i just can’t screw myself up to taking the fenders off.
The reason that the area in the top corner is jagged is becuse they could not get the saw in there to cut the metal. You might recall that I mentioned using a partially disassembled jig saw to cut that out… well, I disassembled it to try to make it fit in that tight corner. Good luck with the air saw, I hope that you can get in in their. Taking the fenders is off is a big job so I can certainly see why you would want to skip that step. Be sure to take some pics so we can see how you did it.
I just realized that I need to put a set of those enclosures in my XR7-G before I hook on the fenders. Luckily WCCC have them in stock. http://www.cougarpartscatalog.com/19stsppous.html
Anyone know where I can find a set of these? Out of stock at WCCC, is anyone repoing these???
Super belated reply, but there is a reproduction of the speaker pods now: link
Before these were on the market, I went the cheap route and got some generic plastic speaker cups and made them work. What’s interesting about the factory style ones is how much extra air space is added behind the speaker, maybe that helps with bass.

