69 passenger side power window not staying up

Been there too - the motor output is coupled to the drive gear by three nylon cylinders around it. I think they were intended as shear pins in case the window jams. Believe it or not, Dorman still makes these and I found them at the auto parts store. Mine were really deformed and replacing them made my power window drive nice and tight and quiet again.

Edit - forcing the window up or down against the stopped motor would be enough to take out these nylon cylinders. The fact that the window won’t go up probably is a switch wiring problem. But I don’t have schematics for a 69.

Very helpful. I found the nylon pins you are talking about at WCCC https://secure.cougarpartscatalog.com/100022635.html?sessionthemeid=26 I may have destroyed them when raising the window, and if so, another life lesson found the hard way.

I’ll swap the red wires this weekend and see if that gets the motor to activate in both directions.

As always, greatly appreciated!

I tried the ones from WCCC too, but couldn’t get them to fit - oversized diameter.

The three little nylon ‘marshmallows’ are easily replaced, as Calicat ( Craig ) says. I used a block of wood ( like a 2 X 4 ) to hold the window in the ‘up’ position, while I removed the motor from the regulator ( just to be safe ). Technically the spring is what holds the window in the up ( default ) position, that is why it ‘seemed’ to work when powering the window up. When you are using the motor to bring the window down, you are working against the spring - hence if the nylon bushings are worn, the motor will just spin and the window won’t go down. These little bushings serve two functions :

(1) When the window reaches the top of its travel ( as determined / pre-set by the window stops and the rubber seal ) - the gear in the motor will begin to deform the nylon bushings and free-wheel around them, sparing the motor from generating more force / burning out and possible forcing the window out of it’s bonded channel ( 1969 style ) - trust me, I’ve seen this happen !

(2) A safety ‘override’ ( over-riding clutch ? )- if something is caught in the window ( a kids arm, for example ), the motor will still keep running ( just as in case #1 ), but once the force of the motor begins to deform the little bushings ( when the kids arm generates sufficient resistance to the motor - just like the window stops ) the drive gear in the motor will again begin to spin around, and no longer create more pressure - preventing crushing or breaking the arm bone.

Remember when you open up the motor, very often the little nylon ‘marshmallows are toasted’ ( broken up, actually ). Especially if you live in a really hot location - they just disintegrate. Make sure you get all the bits out, and inspect the actual gear and the metal teeth on the top of the gear ( looks just like a starter motor Bendix drive gear ! ).

If you have gone to all this trouble, you might as well replace everything, not just the little bushings - it just makes time-sense.

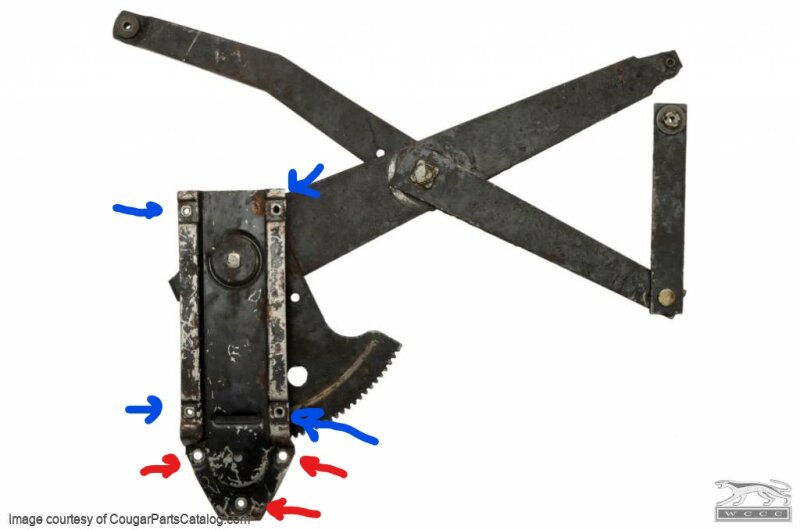
You can get the gear and plate kit at WCCC - item # 32190 ( for $ 29.84 ) :

or just the pins ( Item # 10721 for $ 3.87 )


As to the grease to use, WCCC has Item #: 14-0012 a brake and window mechanism grease.
I haven’t used this so I can’t speak to its effectiveness, but the original FoMoCo power window gear kits contained a bottle of dark ( molybdenum ? ) grease for this purpose. Since I’ve only ever used the original Ford kits, I really can’t recommend the ‘corrrect’ type of grease to use.

The original Ford gear kit was p/n : DOAZ-62234A24-B and there are two on eBay right now ( listing : 165141387074 ) for $49.99, and listing # 274749299022 for $ 30.00 !

Buying an NOS kit would ensure that you DON’T have a problem with the diameter of the little nylon / delrin bushings and you get the proper lubricant !

Very helpful pics from gah! I might add that once the pins have been deformed to let the motor spin, they are toast. I tried an NOS set of pins too, but they broke apart instantly due to age. And taking the motor out and opening it up to clean up all that pin debris and grease the second time was a real pain. So the Dorman pins were the only thing that worked for me. I just used black lithium grease for wheel bearings on my gears.

The wrong wire polarity will cause the motor to operate in the wrong direction.

Where did the “working switch” come from? On the WCCC site Don goes into the switch differences between 69 and 70 Cougars. I had a similar problem with mine. I had a switch for a 70 non-driver location in a rear window location. From that switch I could only move the window one way. I could move it both ways from the driver door switch. Once I found the info, and got the right switch, problem solved.

For the electrical side of the power windows I suggest the link below. It is for an “early” '70 Cougar that should be very similar if not the same as your '69. WCCC has a good u-tube video on the mechanical side, I took a quick look for it but didn’t find it.
https://cccforum.discoursehosting.net/t/power-window-issues-schematics-and-troubleshooting-1970-and-similar/7972/6

Wiring is right and I tried a replacement switch I’d bought from WCCC and had the same issues. I’m going to replace the motor, but from the schematic I found and feeling around blind it looks like the glass and regulator will have to come out to remove it from the assembly?

The motor can be removed from the regulator ( if I recall there are only three bolts holding it in place ), without removal of the glass or the regulator from the door. As i wrote before it is a good precaution to block the window in the full up position before doing this ( in case your spring is weak ) and to take pressure off the gear inside the motor. This helps to make the removal of the motor from the gear teeth which form part of the regulator much easier.

If your motor runs one direction, it is most likely good. The switch simply reverses 12V and ground to the motor. You can unplug the motor from the harness and apply 12V and ground directly to it (in both polarities) at the plug to verify it is good.

Calicat: Agreed, the motor runs, and the driver and passenger door switches both engage in the up and down rocker position. At this point I most likely destroyed the nylon, but since I have a motor on the shelf because I originally planned to replace everything, I’m just going to put the original motor on the shelf (nice clean up and rebuild project someday) and see if the new one corrects the issue.

Gah: I’m feeling pretty dense right now, but with the retaining bolts (red arrows) almost against the interior shell of the door, I don’t see how to get to them. Do I need to loosen or remove the blue bolts and perhaps flex or spin the end of the assembly so they are accessible?


Don’t shortcut/go cheap and use hot glue sticks in place of the nylon dowels. They won’t work. Don’t ask how I know.

BTW there is a trick to install the dowels. Put all three in partway, then press in the rest of the way with the removable gear.

Those bolts can not be removed with out removing the regulator from the door. But the Ford Shop manual tell one to drill 3 holes for access. Funny as it is.

Badcatt, I owe you dinner and drinks if you are ever in town! What a simple and should have been obvious solution to removing the motor…I’ll post tomorrow after the swap.

After some minor surgery the motor swap was easy, and the window stays up again. I took the plate off the old motor and the “marshmallows” were definitely toasted.

Always nice to hear a success story! Well done! Does it run both up and down?

It does, but there are some intermittent oddities indicative of loose or corroded connections. I’m going to remove the driver door panel again and clean everything and check for loose connectors sometime this week, since the driver side switch did nothing, and when I smacked the panel, it worked. :wink:

My drivers window switch is sometimes intermittent like that too. I think it is the contacts in the plug on the harness. Wondering if that housing can be opened up to bend them tighter, clean them up, and then reassembled? I like the relay solution mentioned earlier too.

The plastic housings for the rocker switch wiring connectors have clips that can be pried apart, and the housing hinges at the top. When my passenger side problem started, the housing came apart while removing the door panel, so I had loose wires. Since the end connectors are circular and have a gap to allow expansion to fit around each of the switch posts, it should be relatively simple to clean them with a small wire brush and then crimp their diameter slightly, so they hold onto the switch poles tightly. I recently commented on an old thread that has diagrams showing which wire goes where in the housings which was of great help to me in putting it all back together.

Below is the link that provides the some troubleshooting information, wiring diagrams w/switch connections and showing the operational circuit & switch actions. Later in the link are the relay solution details. The one thing I haven’t documented is the bars I added to the back of the switches to replace the little clips that hold the switches and wiring together. If/when I have to take it apart again I’ll get some pictures.

https://cccforum.discoursehosting.net/t/power-window-issues-schematics-and-troubleshooting-1970-and-similar/7972/1